
Information Security
The Information Security tab sets how recipients open the form, how long the form stays available, how signatures are handled, and which data is saved encrypted with each transaction. To open it, click the Information Security tab (the shield icon) in the template editor.
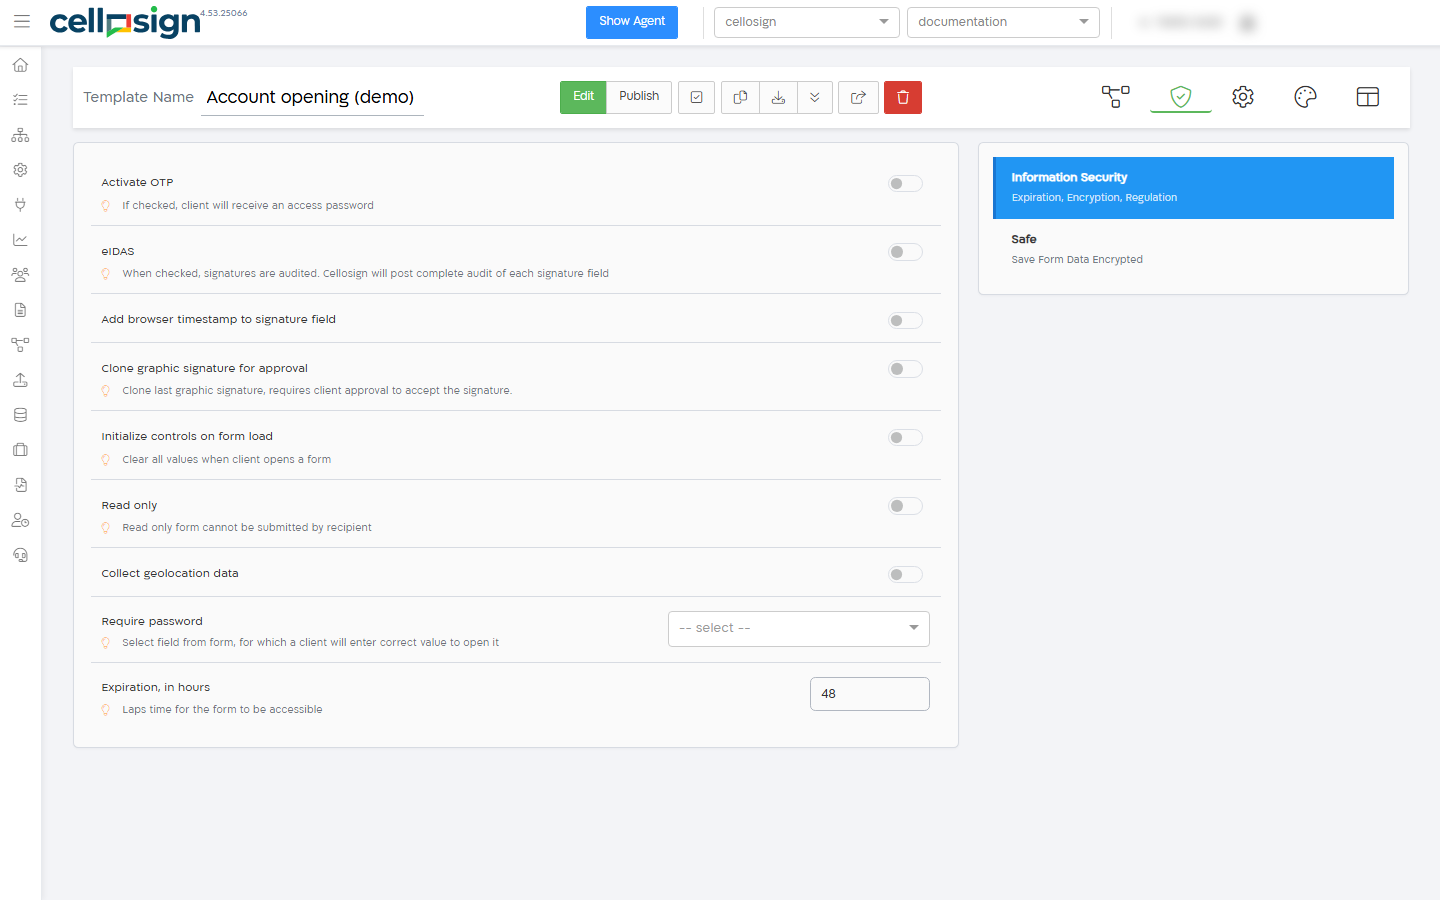
Select a section on the right of the tab:
| Section | What it holds |
|---|---|
| Information Security (Expiration, Encryption, Regulation) | Access, expiration and signature settings. This section opens first. |
| Safe (Save Form Data Encrypted) | The fields and parameters saved in the transaction’s vault. |
The settings are saved with the template. Click Save in the editor header to keep your changes.
Other security settings apply to the whole project. See Project security and Security.
Information Security settings
Section titled “Information Security settings”| Setting | What it does |
|---|---|
| Activate OTP | The recipient must enter a one-time password, sent by SMS or email, to open the form. |
| OTP timeout | Shown when Activate OTP is on. How many minutes the one-time password is valid, from 1 to 1440 (24 hours). The default is 5. |
| eIDAS | Audits the signature fields. Every time the recipient signs or clears a signature, the action is logged. The full log of each signature field is added to the form result that Cellosign sends to your systems, for example to the archive. |
| Add browser timestamp to signature field | Adds the date and time from the recipient’s browser to each signature. |
| Clone graphic signature for approval | Offers the recipient’s last signature in the next signature fields, for the recipient to approve. |
| Initialize controls on form load | Clears the field values each time the recipient opens the form, including values that were filled in advance. |
| Clean up signatures only | Shown when Initialize controls on form load is on. Clears only the signature fields and keeps the other values. |
| Read only | The recipient can view the form but can’t submit it. |
| Collect geolocation data | Adds the recipient’s location, taken from the browser when the form is submitted, to the form result. Shown only when geolocation collection is included in your organization’s plan. |
| Require password | The recipient must enter the value of a field to open the form. |
| Expiration, in hours | How long the form is available after the transaction is created. |
Activate OTP and Require password can’t be used together. When you turn on one, the other is turned off.
Activate OTP
Section titled “Activate OTP”When Activate OTP is on, the recipient gets a 6-digit one-time password by SMS or email, at the address that the form was sent to, and must enter it to open the form. The password is valid for the number of minutes in OTP timeout.
OTP needs the recipient’s phone number or email address, so use it only when the form is sent to the recipient by SMS or email.
Clone graphic signature for approval
Section titled “Clone graphic signature for approval”When the recipient signs a signature field, the same signature is offered in the next signature fields. The recipient approves it instead of signing again.
Each time the recipient opens or reloads the form, they sign the first signature field that isn’t signed yet. The signature is then offered in the following signature fields.
Before you use this option, check with your legal department that an approved copy of a signature meets your requirements.
Read only
Section titled “Read only”The recipient can view the form but can’t submit it.
- Read only is shown only when automatic submit is included in your organization’s plan.
- You can’t turn it on while Show form before submission is on, on the Configuration tab. The message “It is necessary to disable the “Show form before submission” setting.“ appears.
Require password
Section titled “Require password”Select a field from the list. To open the form, the recipient must enter the same value that this field holds, for example an ID number that the agent or your system filled in when the transaction was created. The list shows the template’s Text and Number fields.
The field’s label is shown to the recipient as a hint of what to enter.
To stop requiring a password, clear the selection.
Expiration, in hours
Section titled “Expiration, in hours”How many hours the form is available, counted from the time the transaction is created. The default is 48.
Enter a number from 1 to the project’s maximum. If you enter a larger number, it’s reduced to the maximum. The maximum is set in the project’s session settings:
- Max expiry time for a simple session (in hours), up to 960 hours (40 days);
- when the template’s workflow is on, Max expiry time for a recipient in the BPM process (in hours).
An expiration that is sent when the transaction is created, for example through the API, is used instead of this setting. In a process, the start event’s Expiration Policy can also change it. See Start Event.
When the transaction expires, the form link stops working. You can extend the expiration of a transaction from the Transactions screen.
When the workflow is on
Section titled “When the workflow is on”When Turn workflow on is on, on the Workflow section of the Configuration tab, the access settings are set for each role in the workflow instead (Activate OTP, Require password and Read only). On this tab:
- Activate OTP is shown as on and can’t be changed. OTP timeout still sets how long the one-time passwords are valid.
- Require password and Read only can’t be changed.
- The maximum for Expiration, in hours is the project’s maximum for a recipient in a process.
In the Safe section, you select data that Cellosign saves, encrypted, with each transaction of the template. This data is the transaction’s vault. You can then find transactions by these values and see them in the transaction details.
| Setting | What to select |
|---|---|
| Select fields | The fields whose values are saved. The list shows all the template’s fields except Signature and Paragraph fields. A field’s value is saved when the transaction is created, from the data sent with it, and updated when the form is submitted. |
| Select parameters [Case Sensitive] | The names of request parameters whose values are saved, for example parameter1. Type a name and press Enter. The names are case-sensitive. |
Request parameters are the parameters sent when the transaction is created, on the query string or by the process that creates it.
Vault values are listed by field ID or parameter name. Give the vault fields clear, unique IDs, so you can tell them apart.
Where you use the vault
Section titled “Where you use the vault”| Screen | What you can do |
|---|---|
| Transactions | Search by the exact value of a vault field. See the values under Vault Parameters in the transaction details. The export includes the vault values. |
| Analytics | Filter by the value of a vault field or parameter. |
The vault holds sensitive data. Store and share exported files according to your organization’s data policy.
Related settings
Section titled “Related settings”- To restrict what recipients can enter, use the field type that matches the data, such as Number or Email, and the field’s validation settings. See Field settings.
- Each role’s sign-in settings are on the Configuration tab.