
Start Event
The Start Event is where a process begins. It defines how the process can be started and which data it starts with. A workflow can have several start events, for example one for agents and a public one for clients.
To add a start event, drag Start Event from the palette. Its settings are on two tabs: General and Inputs.
General
Section titled “General”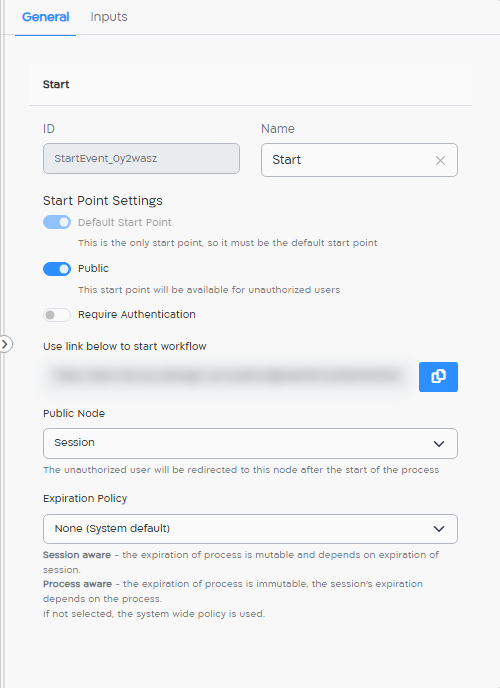
| Setting | What it does |
|---|---|
| ID | The start event’s ID (read-only). Use it to choose this start point when you start a process through the API. Click it to copy it. |
| Name | The name shown on the canvas (default: “Start”). |
| Default Start Point | The start point used when another one is not chosen explicitly. Exactly one start event in the workflow must be the default. If the workflow has only one start event, it is always the default. |
| Public | Lets people who are not signed in to Cellosign start the process, for example clients from your website. |
| Require Authentication | Shown for a public start point. The person who opens the link must sign in first. |
| Use link below to start workflow | Shown for a public start point: the public link that starts the process. Click the copy button to copy it. The link is available after the workflow is saved. |
| Public Node | Shown for a public start point. The Form / Session that the person is redirected to after the process starts. When you turn on Public, the first form after the start event is selected. |
| Expiration Policy | How the expiration of the process is set. See below. |
| TTL (hours) | Shown for Process aware. How many hours the process lives. |
Expiration policy
Section titled “Expiration policy”| Option | Meaning |
|---|---|
| None (System default) | The system-wide policy is used. |
| Session aware | The process expiration can change: it depends on the expiration of its sessions (forms). |
| Process aware | The process expiration is fixed by TTL (hours), and the expiration of its sessions depends on the process. |
Inputs
Section titled “Inputs”Inputs are the data the process starts with, for example the client’s name, email address and phone number. Later elements can use them. See Inputs and data.
Click + Add Input for each input:
| Field | What to enter |
|---|---|
| ID | Created automatically (parameter1, parameter2, …). Read-only. |
| Name | The name of the input, shown when the process is started from the editor. Required. |
| Type | String (the default), Number, Phone, Email or JSONObject. |
| Source | The name of the value in the data that the process is started with, for example the field name sent through the API. Type it and press Enter. Required. |
| Default Value | The value used when the process is started without this input. |
| Required | The process can’t start without this input. |
| Deduplication | Use this input to prevent duplicate processes. See below. |
To remove an input, click its trash icon.
Prevent duplicate processes
Section titled “Prevent duplicate processes”Turn on Deduplication for the inputs that identify a request, for example the client’s ID number and the request type. When a process is started with the same values in these inputs as a process of this workflow that is still running, Cellosign doesn’t start a new process and returns the running one instead. This protects you from duplicates, for example when a client clicks the public link twice.
Signal start event
Section titled “Signal start event”A start event can also start a process when a signal is sent. To make one, click Change type on the start event and select the signal start event. Then enter the Signal Name.
A new process starts every time an element in the project sends a signal with this name in the Project scope. See Signal (Wait).
A signal start event has no Public settings and no Inputs, and it can’t be the default start point.
Start events in a sub process
Section titled “Start events in a sub process”Every Sub Process has its own start event. Its inputs are filled automatically from the elements before the sub process, and it has no Public settings or default values.