
Dependencies and conditional values
Dependencies and conditional values make the form react to what is filled in:
- A dependency changes whether a field is shown, required and editable. For example, show the field “Business license number” only when the client selects “Business” in “Customer type”.
- A conditional value sets the value of a field. For example, fill “Full name” from “First name” and “Last name”.
Both use conditions on the values of other fields. Values can also be calculated with the Formula Builder.
To open the settings, select the field and open the Dependencies or the Conditional Values tab of the field editor. See Field settings for the fields that have these tabs.
Dependencies
Section titled “Dependencies”Add a dependency
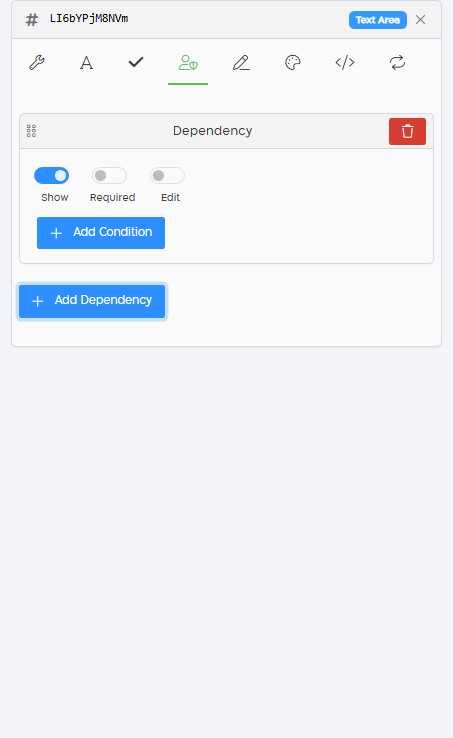
Section titled “Add a dependency”- Open the Dependencies tab of the field.
- Click Add Dependency.
- Set the permissions that apply when the conditions are met: Show, Required and Edit.
- Click Add Condition, and select the field, the operation and the value. See Conditions.
- To add more conditions to the same dependency, click Add Condition again.
- When the template has a workflow, select the roles the dependency applies to. See Dependencies in a workflow.
| Setting | What it does |
|---|---|
| Show | The field is shown. When you add a dependency, it has the field’s current Show setting. |
| Required | The field must have a value before the form can be submitted. Shown when Show is on. Off by default. |
| Edit | The field can be edited. When it’s off, the field is read-only. Shown when Show is on. Off by default. |
When you turn off Show, Required and Edit are turned off too.
To delete a dependency or a condition, click its trash icon.
How dependencies are applied
Section titled “How dependencies are applied”- All the conditions of a dependency must be true (AND). To apply the same permissions in several cases (OR), add a dependency for each case.
- The dependencies are checked from top to bottom, and only the first dependency whose conditions are all true is applied. To change the order, drag a dependency by its handle.
- When no dependency is applied, the field has the permissions set on the Basic and Permissions tab.
- A dependency without conditions is always applied. The Issues tab warns about it.
For example, to show the field “Business license number” only to business customers, and make it required for them:
- In the field’s Basic and Permissions tab, turn off Show.
- In the Dependencies tab, click Add Dependency, and turn on Show, Required and Edit.
- Click Add Condition. Select the field “Customer type”, the operation Equal and the value “Business”.
Dependencies in a workflow
Section titled “Dependencies in a workflow”When the template has a workflow, each dependency shows buttons for the roles it applies to:
- All recipients: when the person button is selected (the default), the dependency applies to all the roles. Click the X button to select the roles one by one.
- One button group for each role: select the person button (Recipient can see) to apply the dependency to the role, or the X button (Recipient can’t see) to not apply it. A role that uses the data model also has a group button (Recipient group can see).
A dependency applies only to the roles that are selected. For other roles, the field has its permissions under Workflow Permissions.
Dependencies of a control group
Section titled “Dependencies of a control group”A control group has its own dependencies, on the Dependency tab of its Group Settings. They apply to all the fields of the group, and work the same way. Their conditions can’t use the fields of the group itself.
Conditions
Section titled “Conditions”A condition compares the value of another field with a value. Dependencies and conditional values use the same conditions.
| Setting | What to enter |
|---|---|
| Select field | The field to check. Fields are shown as the question and the type, for example “Customer type (select)”. Type to search. |
| Select operation | How to compare. Shown after you select a field. The operations depend on the field type. See below. |
| Value | The value to compare with. For Radio fields, and List Of Values fields with options you typed, select the value from the field’s options. For other fields, type it. Not shown for Empty, Not Empty, Selected and Not Selected. |
You can’t select:
- the field itself;
- Location, Paragraph, Button and Drawing fields;
- a field that another condition of the same dependency or conditional value already uses.
Operations
Section titled “Operations”| Field type | Operations |
|---|---|
| Text, Text Area, Email, Telephone | Empty, Not Empty, Equal, Contains |
| Number | Greater than, Less than, Equal, Not Equal, Empty, Not Empty |
| ID Number | Equal, Not Equal |
| Checkbox | Selected, Not Selected |
| Radio, List Of Values | Equal, Not Equal, Empty, Not Empty. With Multi select: Contains, Not Contains, Empty, Not Empty |
| Date, Auto Date | Greater than (after the date), Less than (before the date) |
| File Upload, Image Upload, Signature, Table | Empty, Not Empty |
| Other types | Empty, Not Empty, Equal, Contains |
For the dates you can compare with, see Date. For lists connected to a dictionary, see List Of Values.
Conditional values
Section titled “Conditional values”The Conditional Values tab has up to three parts:
| Part | What it does | Shown for |
|---|---|---|
| Field Clone | The field always shows the value of another field. | All fields with this tab, except Paragraph. |
| Default Value | The value of the field when the transaction is created. | Text, Number, ID Number, Email, Telephone, Date, Text Area, Checkbox. Not shown when Field Clone is set. |
| Dependent values | Values set by conditions while the form is filled in. | All fields with this tab. Not available when Field Clone is set. |
Field Clone
Section titled “Field Clone”Use Field Clone when a value is collected once and shown in several places, for example the client’s name on several pages.
In Field Clone, select the field to copy. The list shows the fields of the same type that are not clones themselves. To stop cloning, clear the selection.
A clone is a read-only field (“Clone is a readonly field”). When you set Field Clone:
- for a List Of Values, the clone gets the list settings of the original field, such as the dictionary and Multi select;
- the field has no Default Value, no dependent values (“Conditional values are not available for cloned fields”), and no Style or Repeater tab, and most of its Values & Display settings are hidden.
When other fields are clones of this field, you can’t make it a clone. The tab shows “This field value is clone for field” and the names of those fields.
Default Value
Section titled “Default Value”Enter the value the field has when the transaction is created:
- Text, Number, ID Number, Email, Telephone, Date: type the value, or click the formula button (Edit Formula) to calculate it with the Formula Builder. The formula is calculated when the transaction is created.
- Text Area: type the text.
- Checkbox: select True (checked) or False (cleared). Leave it empty for no default.
The value must fit the field type. For example, a Number field shows “Only number allowed” for a value that isn’t a number. For Date fields, see Date.
A field has a typed value or a formula, not both. When there is a typed value, the formula button is disabled. To remove the value or the formula, click the trash icon (Clear value/formula).
The defaults of Radio and List Of Values fields are on their Values & Display tab. See Radio and List Of Values.
Dependent values
Section titled “Dependent values”A dependent value sets the field’s value when its conditions are met.
- Click Add Dependent Value.
- Enter the value, or click the formula button (Edit Formula) and build it in the Formula Builder.
- Click Add Condition, and set the condition. See Conditions. Add more conditions as needed.
Dependent values work like dependencies:
- All the conditions of a dependent value must be true (AND).
- They are checked from top to bottom, and only the first dependent value whose conditions are all true is applied. To change the order, drag a dependent value by its handle.
- A dependent value without conditions is always applied. The Issues tab warns about it.
Start a typed value with =. After the =, field IDs are replaced by the values of the fields, and other text is kept as it is:
| Value | Result |
|---|---|
=FNAME |
The value of the field FNAME. |
=LNAME FNAME |
The values of LNAME and FNAME, with a space between them. |
=Approved |
The text “Approved”, when there is no field with this ID. |
=OrderSum * 0.17 |
The value of OrderSum multiplied by 0.17, rounded to a whole number. Use CALC in the Formula Builder to keep decimals. |
=true, =false |
For a Checkbox: checks or clears the box. |
To set the value of a Radio or List Of Values field, use the value of the option. To delete a dependent value, click the trash icon (Remove conditional value) in its header.
For a Paragraph, a dependent value replaces the text of the paragraph. See Paragraph.
Formula Builder
Section titled “Formula Builder”The Formula Builder builds a value from fields and fixed texts, without code. It opens when you click the formula button (Edit Formula) of a default value, a dependent value or a table column.
A formula is a group of rules. At the top of the group, select how the rules are combined:
| Option | What it does |
|---|---|
| CONCAT (the default) | Joins the values of the rules, in order. To put a space between two values, add a Fixed Value rule with a space. |
| REPEAT | Joins the values with a Delimiter (, by default). In Index, you can add a number, a letter or a bullet before each value: 1, 2, 3, a, b, c, A, B, C, א, ב, ג or Bullet. When the data model is included in your plan, select a Model to repeat the rules for each item of a list in the data model. |
| CALC | Calculates the values with the Operation: Add (+) (the default), Subtract (-), Multiply (×), Divide (÷) or Round. Only Number, ID Number, Text, Radio and List Of Values fields can be used. |
| CLEAR | Empties the field (“Value will be cleared”). Has no rules. Available for the top group only. |
To build the formula:
- Click Add Rule, and select the source of the rule:
- Form Field: select the field, and an operation. As is uses the value as it is. Other operations depend on the field type, for example rounding or a number or date format.
- Fixed Value: type the text in Enter text.
- Model: an item of the data model. Shown when the data model is included in your plan, and a REPEAT group has a Model, or the field is a table with a Repeat Model.
- Add more rules. To delete a rule, click its trash icon (Remove rule).
- To combine rules in a different way, click Add Group. A group has its own CONCAT, REPEAT or CALC, and can hold rules and other groups. To delete a group, click Remove Group.
- Click Save.
Save is available only when the formula is complete: each group has at least one rule, each Form Field and Model rule has a field, each Fixed Value rule has text, and each operation that needs a value has one.
After you save, the formula is shown as text, for example CONCAT(#FNAME CONST(" ") #LNAME), and the formula button turns green. To remove the formula, click the trash icon (Clear value/formula).
Check your conditions
Section titled “Check your conditions”The Issues tab of the template editor warns about incomplete dependencies and conditional values, for example a condition without a field or operation, a conditional value without a value or formula, or conditional values that depend on each other in a loop. Click the field in the list to open it on the tab with the problem.