
Cellosign can send emails to your users and clients for invitations, reminders, alerts and more. On cloud installations, we use third-party providers to post and manage email traffic by default.
Using our integrations, you can connect Cellosign to your own email delivery service instead. Two delivery modes are available:
- SMTP — your organization’s standard SMTP server.
- Microsoft Graph sendMail — for Microsoft 365 tenants that require OAuth2 instead of SMTP.
You choose the mode from the Email Delivery Mode dropdown when adding the integration.
Why do I need this?
Section titled “Why do I need this?”There are a few good reasons to integrate with your organization’s email service:
- Control the sender address. By default, Cellosign emails are sent from a Cellosign address such as “invite@cellosign.com”. A custom integration lets you send from your own address, for a more familiar experience for your clients.
- Tighter control over outbound email. Manage your own outbound email traffic and content.
- Meet your IT policy. If your Microsoft 365 tenant blocks SMTP AUTH, the Microsoft Graph mode lets Cellosign send through Graph with OAuth2 instead.
Fallback between integrations
Section titled “Fallback between integrations”You can add as many integrations as you need so they serve as fallbacks for one another. For example, if you have two SMTP integrations, SMTP1 and SMTP2, and SMTP1 fails to respond, Cellosign automatically tries to send through SMTP2.
You can also enable the Use system wide SMTP fallback option (see the field tables below) so that Cellosign’s own SMTP service is used if your integration fails — making sure your emails still reach recipients. This works for both delivery modes.
Setting up SMTP
Section titled “Setting up SMTP”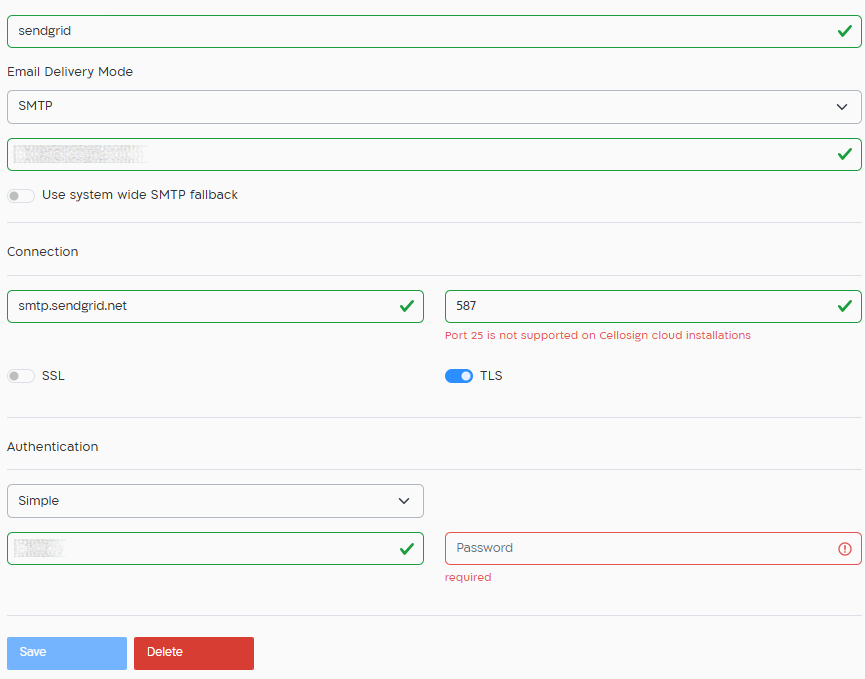
To add an SMTP integration:
- On the dashboard, click Integrations.
- Locate the SMTP integration pane.
- Click Add.
- Set Email Delivery Mode to SMTP.
Fill in the fields:
| Field | What it’s for? |
|---|---|
| Alias | A name to identify this integration. |
| Sender | The name that appears as the sender on the email. The sender can be formatted per RFC 5322 — for example: Your Company <email@company.com>. |
| Use system wide SMTP fallback | When turned on, if your SMTP fails to respond, Cellosign’s own SMTP is triggered so your emails still reach recipients. |
| Host | The host address (DNS name). You may use an IP address, but without TLS/SSL — those options require certificate validation, which cannot be performed against an IP. |
| Port | The port to connect on. Note: port 25 is not supported on Cellosign cloud installations. |
| SSL | Switch SSL on or off as required by your SMTP protocol. Use only when the host is a domain name, not an IP. |
| TLS | Switch TLS on or off as required by your SMTP protocol. Use only when the host is a domain name, not an IP. |
| Authentication | Select the authentication type: Simple or No Auth (see below). |
| User | The username for authentication. |
| Password | The password for authentication. |
Save the integration, then test it: enter an email address under Recipient and click Test.
Authentication types
Section titled “Authentication types”- Simple — uses the standard SMTP authentication protocol and requires a username and password.
- No Auth — requires no authentication at all. This is not a recommended approach. If your SMTP relay has no other way to authenticate, make sure to whitelist the relevant Cellosign IP addresses.
Setting up Microsoft Graph sendMail (OAuth2)
Section titled “Setting up Microsoft Graph sendMail (OAuth2)”In addition to classic SMTP, Cellosign can deliver email through the Microsoft Graph sendMail API. This option is intended for Microsoft 365 organizations whose IT policy blocks SMTP AUTH and requires applications to send email using OAuth2 App-Only (client credentials) authentication.
Why do I need this?
Section titled “Why do I need this?”When this mode is selected, Cellosign does not connect to an SMTP server. Instead, it obtains an OAuth2 token from your Azure AD (Microsoft Entra ID) tenant and posts the email through Microsoft Graph on behalf of the sender mailbox you configure. All Cellosign email types are supported: invitations, reminders, result emails and failure notifications.
- Your Microsoft 365 tenant disables SMTP AUTH, so classic SMTP relay is not allowed by your organization.
- You want emails authenticated with modern OAuth2 credentials instead of a stored SMTP username and password.
- You want every send and token acquisition recorded in the Cellosign audit log.
Prerequisites in Azure
Section titled “Prerequisites in Azure”Before configuring the integration in Cellosign, your Azure administrator must prepare the following in your tenant:
- App registration in your Azure AD tenant, with a client secret.
- Application permissions
Mail.SendandMail.ReadWrite, with tenant admin consent granted.Mail.ReadWriteis required for sending emails with large attachments (see below). - An Application Access Policy that scopes the application to the specific sender mailbox(es) only. This is a least-privilege measure that prevents the application from sending as arbitrary users in your organization.
The following Microsoft Graph calls are used by the integration, with the permission each one requires:
| Graph call | HTTP | Permission |
|---|---|---|
| Send mail | POST /users/{sender}/sendMail |
Mail.Send |
| Create draft | POST /users/{sender}/messages |
Mail.ReadWrite |
| Add inline attachment | POST .../messages/{id}/attachments |
Mail.ReadWrite |
| Create attachment upload session | POST .../attachments/createUploadSession |
Mail.ReadWrite |
| Upload attachment chunks | PUT {uploadUrl} |
— (pre-authenticated URL, no token) |
| Send draft | POST .../messages/{id}/send |
Mail.Send (draft created via Mail.ReadWrite) |
| Delete draft | DELETE .../messages/{id} |
Mail.ReadWrite |
Step 1: Create a Microsoft Graph credential (Secrets integration)
Section titled “Step 1: Create a Microsoft Graph credential (Secrets integration)”The Azure credentials are stored as a Secrets integration in the same project:
- At the dashboard click integrations and locate the Secrets pane.
- Add a client secret integration of type Microsoft Graph (msgraph) with your tenant, client ID and client secret.
- Save and make sure the integration is active.
Step 2: Add the email integration
Section titled “Step 2: Add the email integration”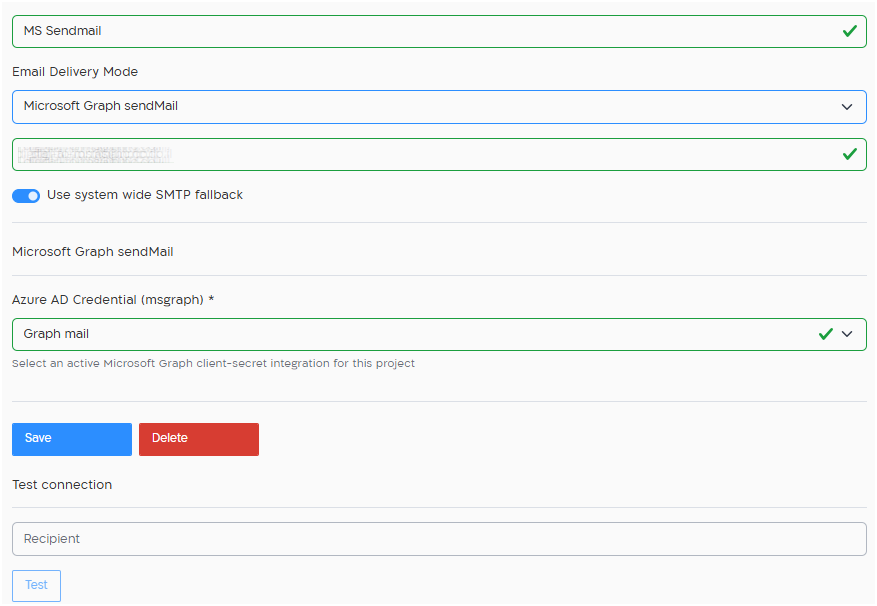
- At the dashboard click integrations.
- Locate the SMTP integration pane and click “Add”.
- Select the Microsoft Graph sendMail mode and fill in the fields below.
| Field | What it’s for? |
|---|---|
| Alias | Provide an alias for the integration. |
| Sender | The mailbox address emails are sent from. This must be a real mailbox in your tenant, and it must be included in the Application Access Policy configured in Azure. |
| System wide fallback | If fallback is turned on, then in case the Microsoft Graph send fails, Cellosign SMTP is triggered to make sure your emails are posted. We strongly recommend turning this option on so email delivery continues even when the Microsoft integration is unavailable. |
| Azure AD Credential (msgraph) | Select the active Microsoft Graph client-secret integration (from Step 1) that holds the tenant, client ID and client secret for this project. |
Save the integration and test it by entering an email address under “Recipient” and clicking “Test”. The test verifies the configuration end-to-end: a token is acquired from your tenant and a test email is sent through Microsoft Graph.
Good to know
Section titled “Good to know”- Large attachments: emails up to 15 MB are supported. Messages with large attachments are sent automatically using the Microsoft Graph draft and upload-session flow, which is why the
Mail.ReadWritepermission is required. - Audit log: token acquisitions and the result of every send (success or failure) are written to the project audit log. Recipient addresses are masked in audit records.
- Fallback behavior: when a Graph send fails and system wide fallback is enabled, the failure is recorded in the audit log before the fallback SMTP attempt, so failures are always visible even when the fallback succeeds.
- Classic SMTP is unchanged: existing SMTP integrations continue to work exactly as before; this is an additional mode, not a replacement.
Troubleshooting
Section titled “Troubleshooting”- 401/403 from Microsoft Graph: verify the client secret is valid and not expired, that
Mail.SendandMail.ReadWriteapplication permissions were granted with admin consent, and that the Application Access Policy includes the configured sender mailbox. - Large emails fail while small ones succeed: the
Mail.ReadWritepermission is most likely missing — it is required for the draft and upload-session flow used for large attachments. - Need to revert? Switch the project back to a classic SMTP integration (or deactivate the Graph integration); the SMTP path is unaffected and immediately usable.