Field change
As a form is being edited by a client you can connect data from the form to fetch or validate data against a remote source, such as your CRM. With the field change webhook you can map and post fields and values from within a live form and inject the answer returned by your endpoint back into the form.
Why do I need this?
Section titled “Why do I need this?”This webhook is useful when not all data can be exposed in a form up front, but instead needs to be fetched or validated as part of a business process — for example, verifying a client ID and fetching their personal details.
To add a field change webhook:
- Follow the Webhook guide to add a new webhook.
- Use the details below for the field change body request and the expected response.
- Map fields and define when and how the data connector acts on the live form. See Setting up the field change connector below.
Field change data request and response
Section titled “Field change data request and response”The following are the definitions for the body request posted from Cellosign to your API.
| Element | What it’s for? |
|---|---|
| event | Object that includes the event type WHEF_FORM_FIELD_CHANGED and a timestamp. |
| session | Details of the session the webhook was fired from. Includes: 1. id — session token. 2. reference — aggregator ID for the business process. 3. transaction_number — ID for the transaction, which can be located in the Cellosign UI. 4. recipient — in a workflow, indicates the recipient’s id in the process and their convention name. 5. labels — a key/value object holding the values injected into labels. See the API documentation for details. |
| client | Object with basic information about the browser the webhook was fired from. |
| change | Object with the id, type and value of the field that triggered the request. |
| fields | Array of objects, each holding the id, type and value of a field to post to the API. |
Example post request
Section titled “Example post request”Your API can expect a request in this format when retrieving information:
{ "event": { "type": "WHEF_FORM_FIELD_CHANGED", "timestamp": "2023-06-30T13:35:51.579895" }, "session": { "id": "UDi8E55p1O", "reference": "19dae31f-377c-44a4-be51-bf3e695dea9d", "process_id": "19dae31f-377c-44a4-be51-bf3e695dea9d", "process_number": 19, "transaction_number": 26, "recipient": { "id": 1, "name": "client" }, "labels": { "CUSTOMER_TAG": "CUSTOMER_VALUE" } }, "client": { "ip": "127.0.0.1", "user_agent": "Best browser ever", "device": "mobile" }, "change": { "id": "myfield", "type": "text", "value": "new value here" }, "fields": [ { "id": "AccountID", "type": "number", "value": "999123456" }, { "id": "FullName", "type": "text", "value": "Ron Jerome" } ]}Expected response
Section titled “Expected response”A successful response from the API should include an array of objects, where each object holds an id and a value key/value pair, as in the example below. Each value is injected into the form control it resolves to (see Response mapping for exactly how each returned id is resolved).
{ "data": [ { "id": "OrderId", "value": "1234-45" }, { "id": "OrderStatus", "value": "Open" } ]}Response mapping
Section titled “Response mapping”Every id in the response is resolved to a form control before its value is written. How resolution works depends on whether Response Mapping is enabled on the connector.
With Response Mapping disabled (default)
Section titled “With Response Mapping disabled (default)”This is the classic behavior and is applied to every existing connector:
- Alias match on outbound fields — if the returned
idequals an alias you assigned to an outbound field in Add mapping, the value is written back to that field. This is why an alias you send out is preserved on the way back. - Direct match — otherwise, if the returned
idis itself a form control ID, the value is written to that control. - Ignore — any other
idhas nowhere to land and is dropped silently.
In other words, without Response Mapping a returned key only resolves if it is either an alias you just sent out or a literal control ID. An enriched or computed value that your API adds under a new key — one that is neither — is ignored.
With Response Mapping enabled
Section titled “With Response Mapping enabled”Enabling Response Mapping lets you explicitly map an incoming alias (any key your API returns) to one or more target form controls, independently of the outbound mapping. Resolution order becomes:
- Response Mapping (alias) — if the returned
idmatches a configured alias, the value is written to each control mapped from that alias (fan‑out). One incoming value can populate several controls. - Direct match — otherwise fall back to a matching form control ID, as above.
- Ignore — otherwise the field is dropped.
A few rules govern how mappings can be configured:
- The same alias may target multiple controls (fan‑out). One returned value is written to every control mapped from that alias.
- Each form control may be targeted by at most one mapping row. This is enforced in the editor to prevent two aliases racing to write the same control. Mapping the same alias to several controls is allowed; mapping two aliases to the same control is blocked.
- The alias mapping takes precedence over a same‑named control. If a returned
idis both a configured alias (X → Y) and the ID of an existing control (X), the value is written to the mapped control(s) and the direct match to controlXis never reached — controlXis left untouched. If you also want the value in controlX, add an explicit rowX → X.
Setting up the field change connector
Section titled “Setting up the field change connector”Follow these steps to apply the webhook to the template:
- Log in to your template.
- Select Integrations in the top right, then click Connectors.
- The field change connector can be applied to LIVE connectors only. Click Add Live Connector.
- Under Source, select Webhook.
- Under Type, select your webhook by its alias.
- Turn its status to Active.
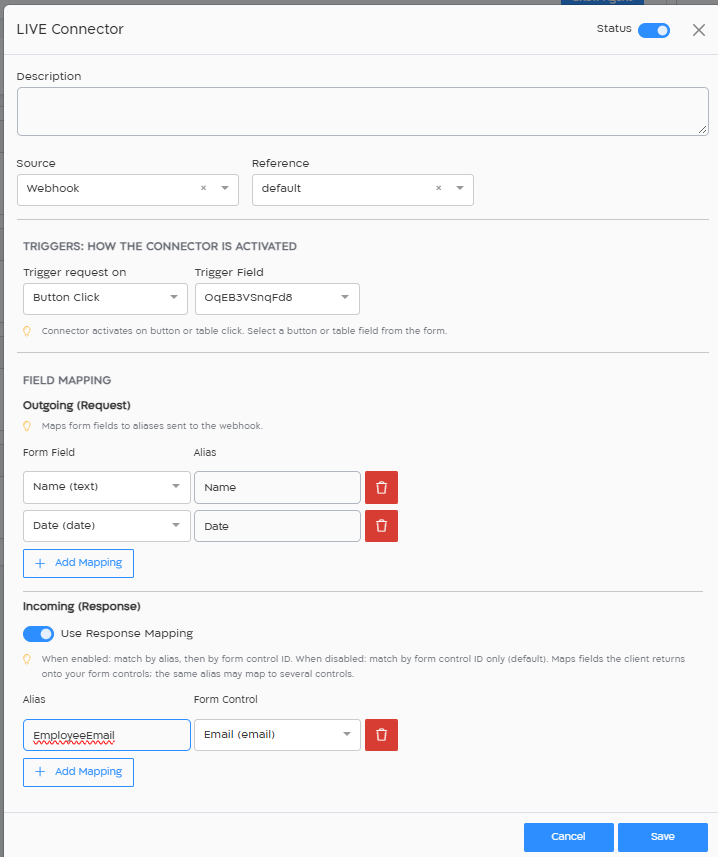
- Define how the connector is triggered. There are two options:
- On button click — select a button on the form that fires the webhook.
- On change — select a field whose value change fires the webhook.
- Add mapping (outbound) — select the fields to post to your API. For each field you can change its convention (alias); this is handy when your API/DB uses different names. On the response, this alias is preserved and mapped back into the form.
- Response Mapping (inbound, optional) — turn on Use Response Mapping to map the keys your API returns onto form controls explicitly. Add a row for each incoming key, choosing the alias (the key returned by the client) and the target form control. The same alias can be added on several rows to fan a single returned value out to multiple controls. A control that is already targeted is greyed out in the dropdown, and a duplicate target is blocked with an inline error while Save stays disabled until it is resolved. Leave the switch off to keep today’s behavior.
- Save the connector and the template.