
Field settings
תוכן זה אינו זמין עדיין בשפה שלך.
Each field has settings for its label, who can see and edit it, how its value is checked, when it is shown and how it looks. You set them in the field editor, in the side panel of the template editor.
This page describes the settings that fields share. The settings of each field type are on the type’s page, under Fields. Dependencies, conditional values and formulas are described in Dependencies and conditional values.
Open the field editor
Section titled “Open the field editor”In the HTML Template editor or the PDF Template editor, do one of the following:
- Click the field in the template.
- On the In Template tab of the field palette, click the field.
The field editor opens in place of the field palette. To close it and go back to the palette, click the X at the top of the editor.
When you select another field, the editor stays on the same tab, if the new field has that tab.
While you add fields to a control group, clicking a field adds it to the group instead of opening its editor. See Control groups.
The header
Section titled “The header”The top of the field editor shows:
| Item | What it is |
|---|---|
| # and the ID box | The field ID. You can change it. See Field ID. |
| Type badge | The field type, for example Text or Signature. |
| X | Closes the field editor. |
Field ID
Section titled “Field ID”Every new field gets a random ID of 12 letters and digits. The ID identifies the field in integrations: values sent with the field’s ID fill the field, and the submitted data uses the same ID. If you connect the template to another system, change the ID to the name that system uses.
An ID:
- can contain English letters, digits and underscores (
_). Other characters are removed as you type; - can’t start with a digit;
- must be unique. No other field, page, section or row in the template can have the same ID.
The new ID is applied as you type. If it isn’t valid, the box turns red. When you leave the box, the last valid ID comes back.
When you change an ID, Cellosign also updates the field’s place in the template, the conditions of dependencies and conditional values, Field Clone, control groups and the destination in the templates sequence. Formulas, integration mappings, workflow conditions, templates sequence conditions and paragraph placeholders keep the old ID. Check them after you change an ID, or change the ID before you use the field in them.
The tabs are shown as icons. Point to an icon to see the name of the tab. Some tabs are shown only for some fields.
| Tab | What you set | Shown for |
|---|---|---|
| Basic and Permissions | The label, the description, and who can see and edit the field. | All fields. |
| Values & Display | Values and display options of the field type, such as list options or a button text. | All fields except Checkbox, Auto Date and File Upload. |
| Validation | How the value is checked, and the error messages. | All fields except Paragraph and Image. |
| Dependencies | When the field is shown, required or editable, by conditions on other fields. | Fields that are not in a control group. |
| Conditional Values | Field Clone, the default value, and values set by conditions. | Text, Number, ID Number, Email, Telephone, Text Area, Date, Checkbox, Radio, List Of Values and Paragraph. |
| Style | Colors, the font size in the PDF, an icon and the layout. | All fields except fields with Field Clone set. |
| Developer | CSS classes. Payment and CIV fields have more settings here. | All fields except Auto Date. |
| Repeater | The data model item that fills the field. | Shown when the data model is included in your organization’s plan. Not shown for Signature fields and fields with Field Clone set. |
| Position | The exact position and size of the field on the page. | The PDF Template editor only. |
Settings of each field type
Section titled “Settings of each field type”| Field type | Page |
|---|---|
| Text, Text Area, Number, Email, Telephone, ID Number | Text fields |
| Checkbox | Checkbox |
| Radio | Radio |
| List Of Values | List Of Values |
| Date | Date |
| Auto Date | Auto Date |
| Signature | Signature |
| Drawing | Drawing |
| File Upload | File Upload |
| Image Upload | Image Upload |
| Paragraph | Paragraph |
| Image | Image |
| Button | Button |
| Table | Table |
| Payment | Payment |
| CIV | CIV |
| Location | Location |
Basic and Permissions
Section titled “Basic and Permissions”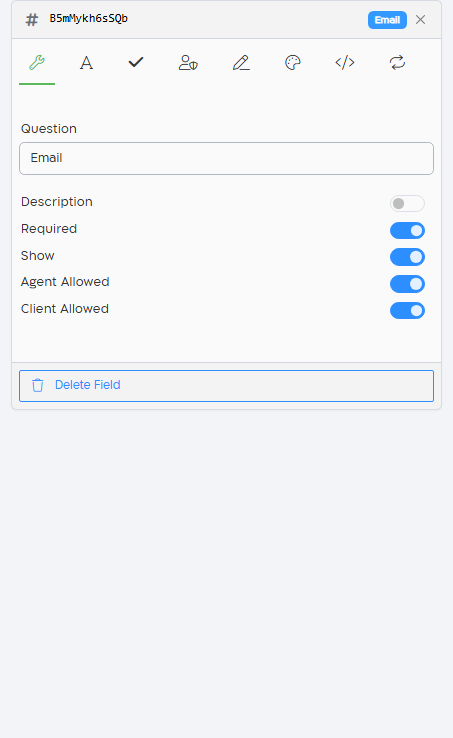
| Setting | What it does |
|---|---|
| Question | The label of the field: the main instruction to the person who fills in the form. Write a clear label, so that the form is accessible. See Form support and accessibility toolbar. |
| Description | Turn it on to add an explanation, shown under the field. Turning it off deletes the description. |
| Required | The field must have a value before the form can be submitted. A field is required only for people who can edit it. |
| Show | The field is shown in the form. Turn it off to hide the field, for example when a dependency shows it only in some cases. |
| Agent Allowed | The agent can edit the field. When it’s off, the field is read-only for the agent. |
| Client Allowed | The client (the recipient of the form) can edit the field. When it’s off, the field is read-only for the client. Not shown when the template has a workflow. |
A new field has Show on. Required, Agent Allowed and Client Allowed depend on the field type. See the field type’s page.
Dependencies can change Show and Required, and whether the field can be edited, while the form is filled in. See Dependencies.
Permissions in a workflow
Section titled “Permissions in a workflow”When the template has a workflow, Client Allowed is replaced by Workflow Permissions: a table with a row for each role.
| Column | What it means |
|---|---|
| Recipient name | The role. |
| Edit | The role can edit the field. |
| View | The role can see the field. |
For the roles, View and Edit are used instead of Show and Client Allowed. Turn on View for every role that has Edit. Agent Allowed still sets whether the agent can edit the field.
Fields in a control group
Section titled “Fields in a control group”When a field belongs to a control group, the group sets its permissions and dependencies:
- The Basic and Permissions tab shows only Question and Description, and the note Managed by group with the name of the group.
- The Dependencies tab is not shown.
To change the permissions and dependencies, edit the group. Its Group Settings have two tabs, Permissions and Dependency, with the same settings as a field, without Question and Description.
Values & Display
Section titled “Values & Display”This tab holds the settings of the field type, for example the options of a Radio field or the text of a Button. See the field type’s page.
One setting is shared by several types:
| Setting | Shown for | What it does |
|---|---|---|
| Show clear buttons | Text, Text Area, Number, ID Number, Email, Telephone, Date | Shows an X button that empties the field. The button is shown only to people who can edit the field. |
Validation
Section titled “Validation”This tab holds the rules that check the value. Most rules belong to the field type, for example Mask for a Text field or Set Minimum Date for a Date field. See the field type’s page.
These settings are shared by several types:
| Setting | Shown for | What it does |
|---|---|---|
| Error if no value entered | All fields that have a Validation tab | The message shown when a required field is empty. Leave it empty to show the default message. |
| Error Message Invalid | Text, Text Area, Number, ID Number, Email | The message shown when the value is not valid. Leave it empty to show the default message. |
| Regex Validation | Text, Text Area, Number, ID Number | A regular expression that the value must match. See Regex Validation. |
| Setting | Shown for | What it does |
|---|---|---|
| Background Color | All fields | The background color of the field. |
| Font Color | All fields except Signature | The color of the field’s text. |
| Pen color | Drawing | The color the client draws with. |
| Font Size in PDF | Text, Number, ID Number, Email, Date, Auto Date | The size of the value in the signed PDF, from 5 to 100 px. |
| Letter spacing in PDF | The same types as Font Size in PDF | The space between the letters of the value in the signed PDF, from 0 to 50 px. |
| Inline Block | All fields except Table | Shows the field on the same line as the fields next to it. Turn it on for the field before and the field after as well. |
| Apply underline in result PDF when field has no value | HTML templates: Text, Number, ID Number, Email, Telephone, Text Area, Date, List Of Values, Signature, Paragraph | Shows an underline in the signed PDF where the field is empty. |
| Field Icon | All fields except Checkbox, Radio, Paragraph, Signature, Drawing and Table | An icon shown in the field. See below. |
To pick a color, click the color box. To remove a color, click the trash icon next to it. Values outside the allowed range are not saved.
To add an icon:
- Click Choose Icon.
- In Select Icon, find the icon. You can type a name in Search Icons.
- Select the icon and click Save.
- In Icon Position, select Left (the default) or Right.
To remove the icon, click Clear Icon.
Some types have more style settings, for example Widget types for a Radio field. See the field type’s page.
Tip: to keep the form accessible, set the colors of the whole form on the Design tab, and don’t change the colors of single fields.
Developer
Section titled “Developer”| Setting | What it does |
|---|---|
| Set Class | CSS classes added to the field in the form, for your own JavaScript and stylesheet. Type a class name and press Enter or , to add it. To remove the last class, press Backspace. |
Built-in class:
| Class | What it does |
|---|---|
pdf_hidden |
In an HTML template, the field is shown in the form, but not in the preview and the signed PDF. |
Payment and CIV fields have more settings on this tab. See Payment and CIV.
Repeater
Section titled “Repeater”The Repeater tab connects the field to the template’s data model. It is shown when the data model is included in your organization’s plan.
| Setting | What it does |
|---|---|
| Repeat Model | The data model item that fills the field. When a template is built from data, the field gets the item’s value as its default value. For a field in a repeated page, section or row, the items of the repeated list are shown first, followed by the items at the top level of the data model. |
For a Table field, Repeat Model is a list in the data model: the table gets a row for each item. Then, for each Column, click the formula button to set its Value with the Formula Builder. If you change the model, Cellosign asks to confirm, and clears the column formulas.
See Repeat a page, section or row.
Position
Section titled “Position”The Position tab is shown in the PDF Template editor. It sets Top, Left, Height and Width, in percent of the page. See Move and resize fields.
Copy, save and delete a field
Section titled “Copy, save and delete a field”Copy a field
Section titled “Copy a field”Right-click the field in the template and click Clone. The copy has a new ID and the same settings. See Copy and save elements and Clone a field in the PDF Template editor.
Clone in this menu makes an independent copy. It is not related to the Field Clone setting, which makes a field show the value of another field.
Save a field for reuse
Section titled “Save a field for reuse”In the HTML Template editor, right-click the field and click Save field as template. This is available when your plan includes saved templates. See Saved objects.
Delete a field
Section titled “Delete a field”- Open the field editor on the Basic and Permissions tab.
- Click Delete Field at the bottom of the tab.
- At “Delete this field?”, click Delete.
You can’t delete a field that other parts of the template use. Instead, the editor shows “Cannot delete — field is in use:” and the reasons. A field is in use when:
- another field or a control group uses it in a dependency;
- another field uses it in a conditional value condition or formula;
- another field is a Field Clone of it;
- it belongs to a control group;
- a paragraph uses it as a placeholder;
- an integration uses it in a field mapping, a lookup or as its trigger;
- a workflow condition or the templates sequence uses it.
Remove these uses, and then delete the field. Click Cancel to close the message.