
Form / Session
תוכן זה אינו זמין עדיין בשפה שלך.
The Form / Session element creates a transaction (session): it gives a form, built from a template, to one recipient role, and waits until the form is submitted. Then the process continues.
To send the recipient a link to the form, click Append form created event on the form, and connect a Message with the Invitation template after the event. The message is sent as soon as the form is created. See Form events.
To add a form, drag Form / Session from the palette, or click Append form on the element before it. Its settings are on these tabs:
| Tab | What’s on it |
|---|---|
| General | ID, name, description and the session to take default values from. |
| Inputs | The data the form uses. See Inputs and data. |
| Form | The template, the recipient’s role, field values, URLs and the document. |
| Additional Data | Extra data saved with the transaction. |
| Outputs | What later elements can use: the session and its result. |
| Multi Instance | Shown only for a multi-instance form. See Repeat an element for each item. |
Most fields on the Form tab have a switch with a link icon. Turn it on to take the value from a Reference (an input or a process value) instead of typing it.
General
Section titled “General”| Setting | What it does |
|---|---|
| ID | The element’s ID (read-only). Click it to copy it. |
| Name | The name shown on the canvas (default: “Session”). |
| Use session as defaults | An earlier form to continue from. The new form starts with that form’s data, document and additional data. Lists the element’s inputs of type Session Result. When the form follows another form, the earlier form is selected automatically. |
| Description | The description of the transaction, shown in transaction lists. |
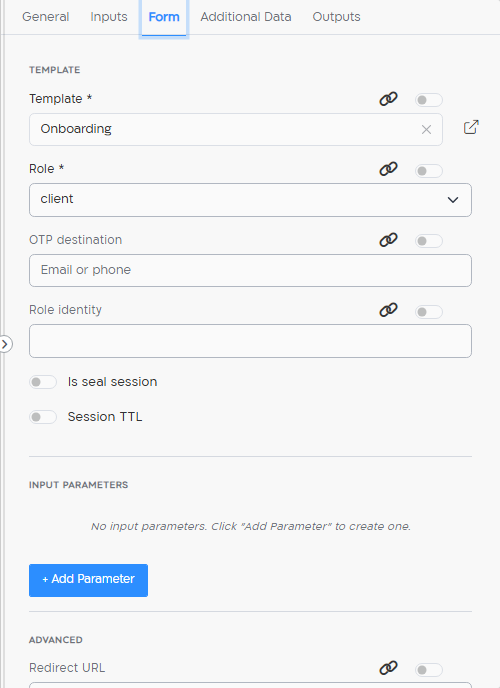
Template
Section titled “Template”| Setting | What to enter |
|---|---|
| Template | The template of the form. Search by name or ID. Click the link icon next to it to open the template in a new tab. Required. |
| Role | The recipient role in the template that this form is for. Required. |
| OTP destination | The email address or phone number to send the one-time password (OTP) to, when the role requires OTP. |
| Role identity | The identity the recipient must sign in with, when the role requires end-user SSO. |
| Is seal session | Creates the signed document automatically from the data, without sending the form to anyone. Requires the seal permission. |
| Session TTL | Turn it on to set how long the form can be filled in, in hours (1 to 960). This overrides the expiration set in the template. |
Input Parameters
Section titled “Input Parameters”Fill in fields of the form with values. Click + Add Parameter, select the field in Key (search by the field’s question or ID), and enter the Value, or turn on the switch to use a Reference. Input parameters override the values taken from Use session as defaults.
Advanced
Section titled “Advanced”| Setting | What to enter |
|---|---|
| Redirect URL | Where to send the recipient after they submit the form. Must start with http:// or https://. |
| Archive URL | Where to send the completed form and its documents. Must start with http:// or https://. |
| Archive Method | The HTTP method of the archive request. Only POST is supported. |
| Archive Headers | HTTP headers to add to the archive request, for example for authentication. Click + Add Header for each header. |
Document
Section titled “Document”Drag a PDF file to Document, or click to select it, to use it as the form’s document. To remove it, click its trash icon.
Analyze Document is shown when a document is attached. When it’s on, Cellosign finds the field tags in the PDF and creates the form fields from them.
Additional Data
Section titled “Additional Data”Extra key-value data saved with the transaction, outside the form fields. Click + Add Parameter, enter the Key, and enter the Value or turn on the switch to use a Reference.
Outputs
Section titled “Outputs”Later elements can use these outputs of the form:
| Output | What it holds |
|---|---|
session (Session) |
The transaction: its template, role, document, description, form ID and UUID. Use it, for example, as the Invitation Session of a message. |
result (Result) |
The submitted form: Form Data (the values of the fields), the session and the Signed Document. Available after the form is submitted. |
Shared form
Section titled “Shared form”A shared form lets another role work on a form that an earlier Form / Session created, instead of creating a new transaction. Use it, for example, when an agent and a client fill in the same form.
To make one, click Change type on a Form / Session and click Shared Form at the top of the menu. A second person icon appears on the element. Click Shared Form again to change it back to a regular form.
Changing between a regular form and a shared form clears the settings on the Form tab. The inputs and outputs are kept.
A shared form has these settings on the Form tab:
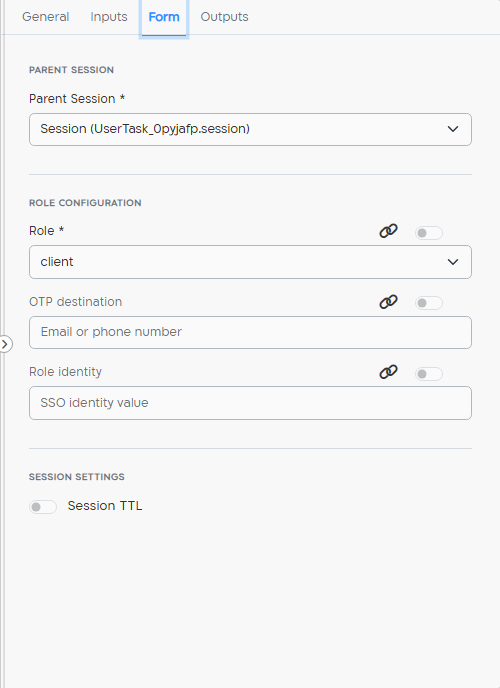
| Setting | What to enter |
|---|---|
| Parent Session | The earlier form to share. Lists the sessions of the forms connected before this element. Required. |
| Role | The role in the parent form’s template for this recipient. Required. |
| OTP destination | The email address or phone number to send the one-time password to. When it’s set, the recipient must enter an OTP. |
| Role identity | The identity the recipient must sign in with through end-user SSO. When it’s set, end-user SSO is required. |
| Session TTL | How long the form can be filled in, in hours (1 to 960). |
A shared form has no template, input parameters, document, additional data or description of its own.
Validation
Section titled “Validation”The editor reports these problems under Validation Errors:
- a form without a template or a role;
- an input parameter without a key or a value;
- a redirect or archive URL in a wrong format;
- an OTP destination that is not an email address or phone number;
- an input without a name or a source.