
Transactions
תוכן זה אינו זמין עדיין בשפה שלך.
The Transactions screen lists the forms (transactions) of your projects: who each form was sent to, and when it was created, opened by the client, submitted or set to expire. From the list you can open a transaction as the client or as the agent, send a reminder, extend its expiration or delete it.
To open the screen, click Transactions in the left menu.
Note: Transactions File is a different screen, used to create transactions from a spreadsheet. See Post transactions from spreadsheet.
Which transactions you see
Section titled “Which transactions you see”| Role | Transactions shown |
|---|---|
| Organization manager | All transactions in the projects of the organization |
| Project manager, Implementer | All transactions in the current project |
| Agent | Transactions the agent created, and transactions sent or assigned to the agent |
Every user also sees the transactions they created and the transactions assigned to them.
Find transactions
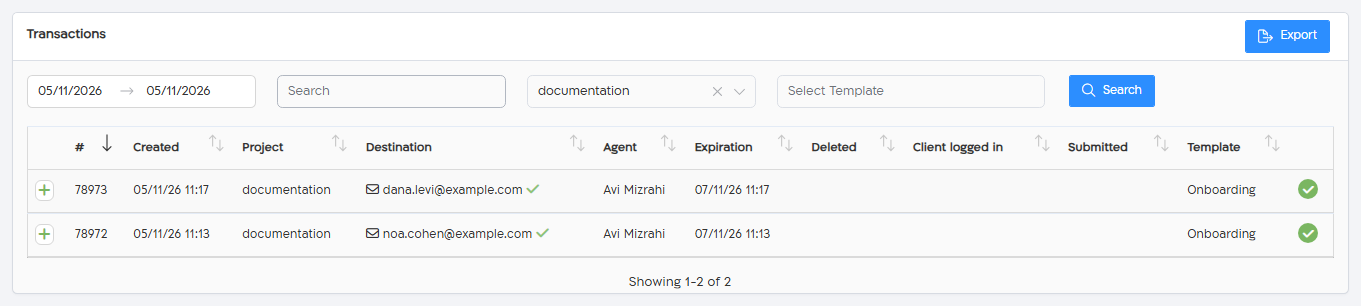
Section titled “Find transactions”Set the filters at the top of the screen and click Search. The filters are combined, and the list is updated only when you click Search.
| Filter | How it works |
|---|---|
| Date range | The date the transaction was created. The default is today. Pick dates in the calendar, or use Today, Last 7 Days or Last 30 Days. The date range always applies, also when you search by ID or token. |
| Search | Enter a transaction ID (#) or token to find that transaction. You can also enter part of a template name or description, an agent’s name, user name or email, a request parameter value, or a workflow ID. To search by recipient, enter the recipient’s full email address or phone number. |
| Project | Select a project. |
| Template | Select a template. Available after you select a project. |
| Vault field and value | Available when the selected template has vault fields. Select the field and enter the exact value; the search is case-sensitive. |
Tip: the token is the transaction’s session ID. See How to track your Session ID / Token.
The filters are not saved. When you leave the screen and come back, it shows today’s transactions again.
For example, to find a transaction by its ID: open the date range, click Last 7 Days and OK, enter the ID in Search, click Search, and click + on the transaction to expand it.
The transactions list
Section titled “The transactions list”The list shows 20 transactions per page, newest first.
| Column | What it shows |
|---|---|
| # | The transaction ID. |
| Created | When the transaction was created. |
| Project | The project of the transaction. |
| Destination | Each email address or phone number the form was sent to, with its delivery status: a check mark when sent, a double check mark when received, and a sync icon when scheduled. |
| Agent | The user who created the transaction. |
| Expiration | When the transaction expires. |
| Deleted | When the transaction was deleted. |
| Client logged in | When the client logged in to the form. |
| Submitted | When the form was submitted. |
| Template | The template of the transaction. |
| (last column) | A green check mark, or a red X when document generation, the archive, the mail to the agent or the mail to the client failed. |
A transaction has no separate status field: its state is shown by the Submitted, Expiration and Deleted dates.
Transaction details
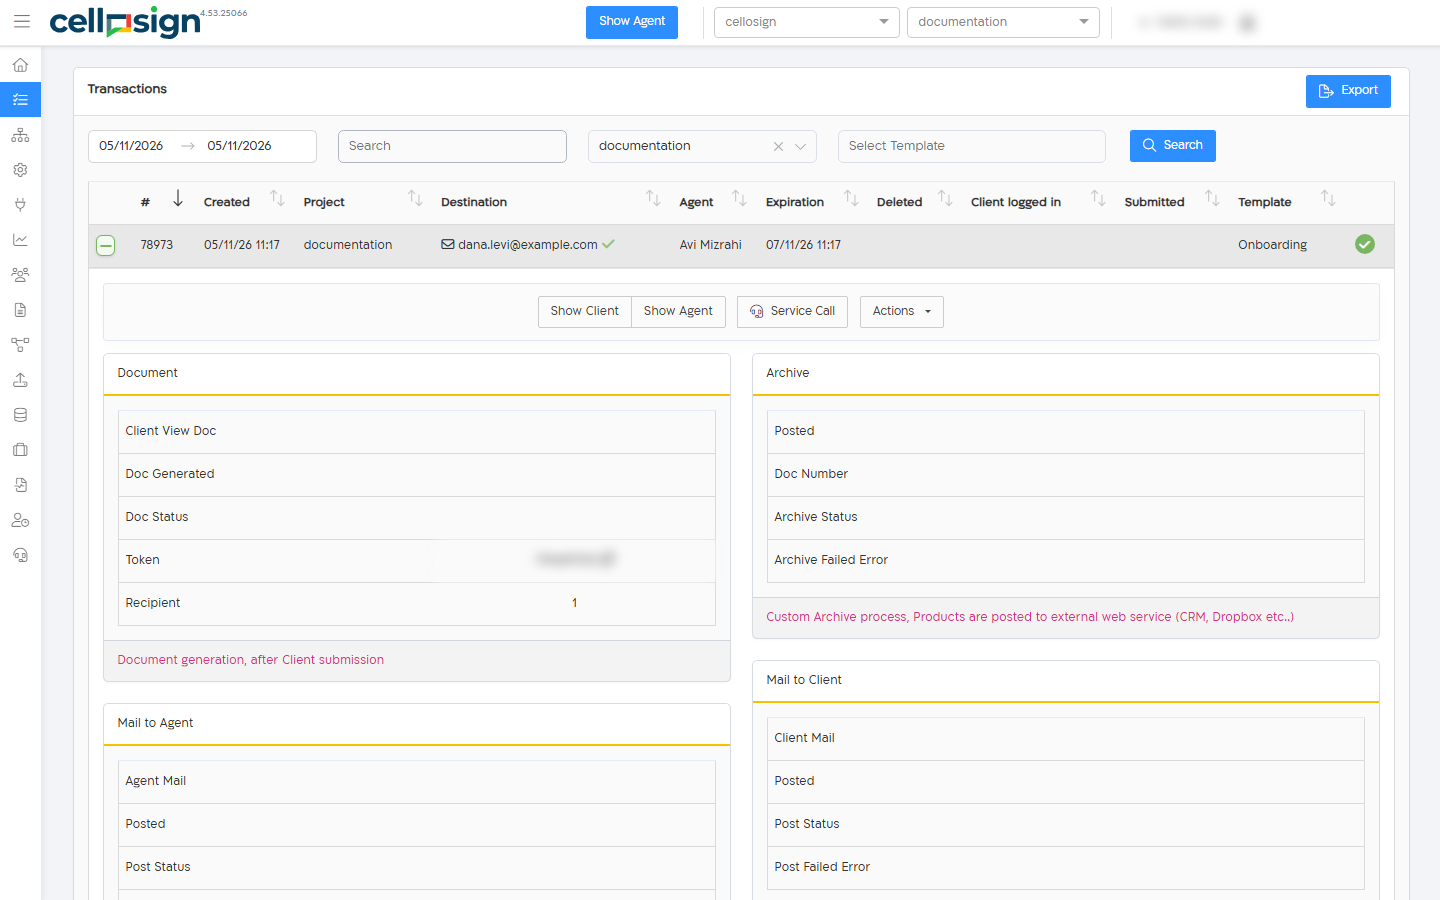
Section titled “Transaction details”Click + (or any cell of the row) to expand a transaction and see its details:
| Section | What it shows |
|---|---|
| Document | The client view document, when the document was generated and its status, the Token, the Workflow ID and the Recipient. Click the token or the workflow ID to copy it. |
| Archive | When the transaction was posted to the archive, the document number, the archive status and any error. |
| Mail to Agent / Mail to Client | When the mail was sent, its status and any error. |
| Request Parameters | The parameters sent when the transaction was created, on the query string or by the create session process. |
| Vault Parameters | The transaction’s vault values, when the template has vault fields. |
| Reminders | Each reminder, with its status, destinations and scheduled time. |
Actions
Section titled “Actions”The actions are in the expanded row of the transaction.

| Action | What it does |
|---|---|
| Show Client | Opens the form as the client sees it, in a new tab. Available to project managers, implementers and organization managers. |
| Show Agent | Opens the transaction in the agent screen, in a new tab. Available when the agent screen is enabled for the project. |
| See Workflow | Opens the process the transaction belongs to. |
| Related Transactions | Lists the other transactions of the same process, within the current date range. |
| Service call | Opens the support request form for this transaction. See Contact support. |
| Actions > Extend expiration | Extends the transaction’s expiration. See below. |
| Actions > Reminder | Sends the client a reminder. See below. |
| Actions > Delete | Deletes the transaction. See below. |
Show Client, Show Agent and the Actions menu are available only while the transaction is not submitted and not deleted. See Workflow and Related Transactions appear only for transactions that belong to a process.
Extend expiration
Section titled “Extend expiration”Select 1 Day, 2 Days or 7 Days and click Confirm. The days are added to the transaction’s current expiration date, not to today’s date. For example, a transaction that expires on 10/11 and is extended by 2 days expires on 12/11.
If the transaction belongs to a process, only this transaction is extended, not the whole process.
Reminder
Section titled “Reminder”- In Send reminder, select an address from the Destinations list, or enter a new email address or phone number under Email | Phone and click Add new destination. A phone number must have 10–15 digits, optionally starting with
+. - Edit the Message if needed. The default text is “Reminder”.
- Click Confirm.
The reminder is sent immediately, by email or SMS, with a link to the form. The selected address becomes the transaction’s destination.
Delete
Section titled “Delete”Click Delete and confirm. Deleting a transaction:
- stops the form link from working;
- cancels its scheduled reminders;
- if the transaction belongs to a process, cancels the whole process, as the confirmation message warns: “Please note: deletion may incur deleting other forms and processes related to this transaction”.
For a transaction that was not submitted, the same actions and webhooks run as when a transaction expires.
The transaction stays in the list, with the deletion date in the Deleted column.
Export
Section titled “Export”Click Export to download CellosignTransactions.csv with all the transactions that match the current filters, not only the current page. The export uses the filters as they are set on the screen, even if you haven’t clicked Search.
The exported file can include sensitive data from the transactions, such as vault parameters. Store and share it according to your organization’s data policy.