
STORAGE
תוכן זה אינו זמין עדיין בשפה שלך.
At the end a business process Cellosign produces number of files that can be shipped via email, API or directly to your storage.
Currently we support out of the box integrations for FTP/FTPs and Google drive.
Storage service can be deployed with “callback”, which means an API request will be executed from Cellosign to let you know that a storage call has been made. If you have decided to use storage integration, it is recommended to couple it with a callback webhook so you can close the gap between completion on Cellosign to acknowledge in your application.
Why do I need this?
Section titled “Why do I need this?”There are number of reasons to integrate with your organization Storage:
- Occasionally business process ends up with huge and heavy list of attachments that it makes hard for an API to process massive requests
- You may have more options on files transformation such as the ability to compress all in a single zip archive
Follow these steps to add Storage integration:
- At the dashboard click integrations
- locate Storage integration pane
- click “Add”
Basics and storage type
Section titled “Basics and storage type”- Insert an alias for the integration
- Set implicit or Explicit. Implicit means that whenever a business process is completed, this integration will fire off. Explicit means, don’t fire unless instructed. See below reference for setting up explicit/implicit
- Select storage type FTP or Google drive. See below reference to each type
- Enter relative path
- Apply file transformations as needed. see details below
- Setup callback webhook. See details in Webhook: Callback
- Upload file and test

Configure Google drive integration
Section titled “Configure Google drive integration”First step with Google drive integration is to prepare and download your service account.
- Use Service key link to create service key at your Google Cloud Platform -> Google Drive Api -> Credentials -> Create Credentials -> Service account

-
download your JSON file with service account credentials
-
Modify default scopes case required
-
Configure path where files will be uploaded into

Configure SFTP, FTP and FTPs integration
Section titled “Configure SFTP, FTP and FTPs integration”Enter the following details to integrate with your FTP server
| Field | What it’s for? |
| Host | Insert DNS name name or IP |
| Port | Insert listening port. Note that we may from time to time inform, in advance, on a blockage for ports that are considered dangerous. |
| Base path | Relative path for the files to be uploaded into |
| User | Insert user name to authenticate |
| Password | Insert password |
| SSH file with key | Upload SSH key authentication, be sure to use private key, typically called id_rsa, and not the public key (id_rsa.pub). |
| Max connections | Set maximum connections allowed. This is the maximum concurrent engagement from Cellosign with your FTP server. processes will be queued as needed |
| SSL | Switch SSL on for FTPs |

Explicitly/Implicitly Storage integration
Section titled “Explicitly/Implicitly Storage integration”Storage can be setup to fire off Implicitly that means every business processes will fire this integration. For example a storage action will be executed to your when every business process within your project is completed.
This is the recommended approach if indeed all your business process should end up in in this manner. However if there are different use cases, such as: separate endpoints or some business process does not need storage, it is recommended to couple your integration with a business process Explicitly.
To explicitly couple a Storage with business process we purpose two options:
- Manually connect it to specific template(s), which means, templates configuration will include explicit coupling with your storage integration. See details below
- Ad hoc integration for a business process: When the integration is set to explicit, the storage pane display the integration code that can be added to create session request. Simply add the code to your request. All ad hoc integration can be add within the integrations Array

Setting up storage connector
Section titled “Setting up storage connector”Follow these steps to apply the storage integration into the template:
- Login to your template
- Select “Integrations” on the top right and then click on “Connectors”
- Storage can be applied to “Submit” only. Click “Add Live Connector”
- On source, select “Storage”
- On Type: select your integration [by alias]
- Turn it’s status to “Active”
- Save the connector and the template

File transformations
Section titled “File transformations”Initial set of files can be transformed with simple rules. Each rule selects some files and applies some action to selected set. It is possible to select files by tag, by content type or select all files.
Initial set of files in the end of session looks like this
| Description | Tags | Content type |
|---|---|---|
| File with process metadata | metadata | application/json |
| Signed pdf | signed_document | application/pdf |
| File attachments | file, attachment | */* |
| Image attachments | image, attachment | image/* |
Transformation examples
Section titled “Transformation examples”Collect all files to zip and apply unique name
Section titled “Collect all files to zip and apply unique name”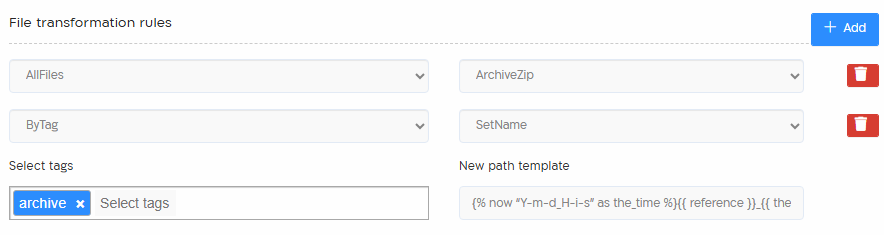
- Click “Add”, Select “All files” from left drop down and “Archive Zip” in drop down on the right. With only this option you will receive to your FTP file named “archive.zip”
- Click “Add” Select “By tag” from the left and “set name” on the right
- On select tag, enter “archive”.
- In “New template path” enter this string “{% now “Y-m-d_H-i-s” as the_time %}{{ reference }}_{{ the_time }}.zip“
This parameter join the process reference id and add to it the current date time : “b7eeb82f-9aab-4dea-813c-7ba06b515867_2025-01-08_14-01-06.zip”
Why this is a good option?
- All process product are aggregated into a single file (And not scattered)
- Zip ensure single commit. As oppose to separate files where 1 file can go through and the other wont
- Unique by date time.
- Reference that always exists in our output ensure that process can be located easily on our dashboards