
SMS
תוכן זה אינו זמין עדיין בשפה שלך.
SMS are typically used when posting invitations to clients, reminders and also as evidence for processing at the end of client engagement.
Cellosign is typically bundled with an SMS out-of-the-box service. However, in case your organization requires to explicitly integrate with your own provider, you are able to easily configure top SMS providers such as: inforu, bezeq, 019, unicell and Simasti with configuration only.
In case you require an additional provider, let us know.
Why do I need this?
Section titled “Why do I need this?”In case your organization requires tight control on outbound SMS for any reason such as regulatory, you may add your provider as a plugged-in SMS integration. Once done, all SMS traffic for your project will consume your integration.
Note that SMS integration is deployed per project and not per organization. In case you need a custom integration for all your organization’s projects, this has to be done one by one. Also, you may add as many SMS integrations as you need for the purpose of fallback. For example, assume you have configured SMS1 and SMS2 with different providers — in case SMS1 does not respond, Cellosign will automatically fire off the SMS2 integration.
Note: SMS failure means that an error response was received from the SMS provider. It does not mean whether the message arrived to the recipient or not.
Setting up SMS integration
Section titled “Setting up SMS integration”To add an SMS integration, follow these steps:
- At the dashboard click Integrations.
- Locate the SMS Integration pane.
- Click Add.
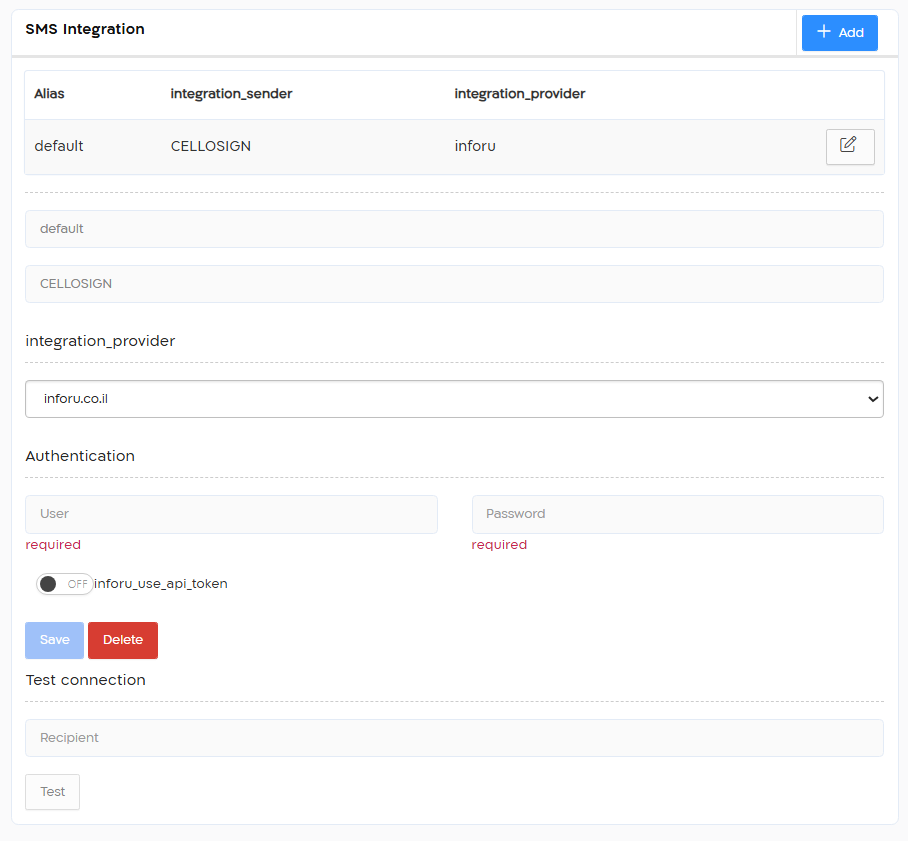
| Field | What it’s for? |
|---|---|
| Alias | Provide an alias for the integration. |
| Sender | Insert the name that will appear as the sender on the SMS. Be aware that some countries have limitations on the sender name — typically phone numbers and digits are prohibited. Please consult with your provider regarding this issue. |
| Integration provider | Select your provider from the list. |
| User | Insert the user name provided by your SMS provider. |
| Password | Insert the password provided by your SMS provider. In case the inforu provider is selected, you also have the option to use inforu API token authentication — your token goes into password. |
Save the integration and test it by entering a phone number under Recipient and clicking Test.
Simasti
Section titled “Simasti”Simasti (simasti.com) is supported as an SMS integration provider. Unlike providers that take a user name and password directly on the integration form, Simasti authenticates with a bearer token that Cellosign obtains automatically from a stored Client Secret. Setting up Simasti is therefore a two-step process: first create the credential, then create the SMS integration that uses it.
Step 1 — Create the Simasti credential (Client Secret)
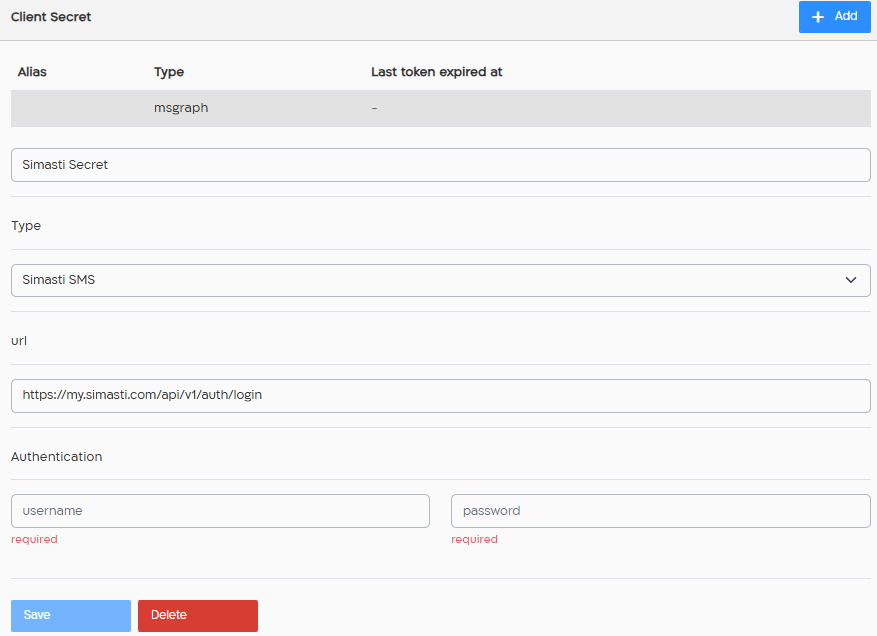
Section titled “Step 1 — Create the Simasti credential (Client Secret)”Under Client Secrets, click Add and create a secret:
- Alias — a name for the credential, e.g.
Simasti Secret. - Type — select Simasti SMS.
- url — the Simasti login endpoint:
https://my.simasti.com/api/v1/auth/login. - Authentication — enter the username and password of your Simasti account (both required).
Save the secret. Cellosign uses these credentials to log in to Simasti and retrieve a time-limited bearer token, and automatically requests a new token when the current one expires.
Step 2 — Create the SMS integration
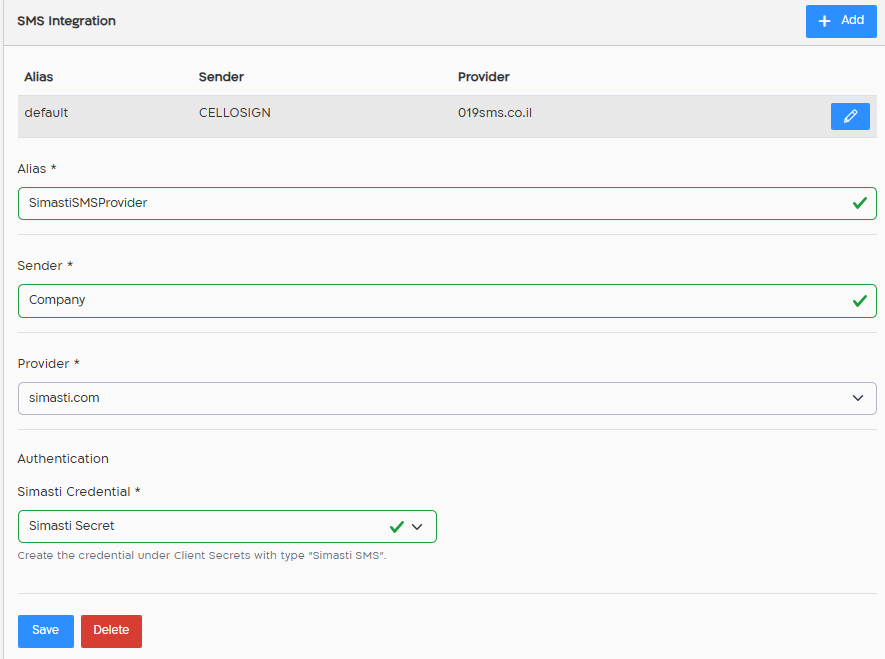
Section titled “Step 2 — Create the SMS integration”In the SMS Integration pane click Add, then:
- Alias — a name for the integration, e.g.
SimastiSMSProvider. - Sender — the sender name that will appear on the SMS (subject to the sender-name limitations noted above).
- Provider — select simasti.com.
- Simasti Credential — under Authentication, select the Simasti SMS credential you created in Step 1.
Save the integration and test it by entering a phone number under Recipient and clicking Test.
Reference
Section titled “Reference”- Simasti API documentation (login, send SMS, webhooks): https://api.simasti.com