
HTML Template editor
תוכן זה אינו זמין עדיין בשפה שלך.
The HTML Template editor tab is where you build the HTML form: the pages the client goes through, and the sections, rows and columns that hold the fields. The form adjusts to the client’s screen.
To open it, click the HTML Template editor icon in the tab bar of the template. It’s the first tab that opens for an HTML template. For the toolbar, saving and the other tabs, see The template editor.
The tab has two parts: the form structure, and a side panel. When nothing is selected, the side panel shows the field palette. When you click a page, section, row or field, the side panel shows its settings. To go back to the palette, click Close or the X at the top of the panel.
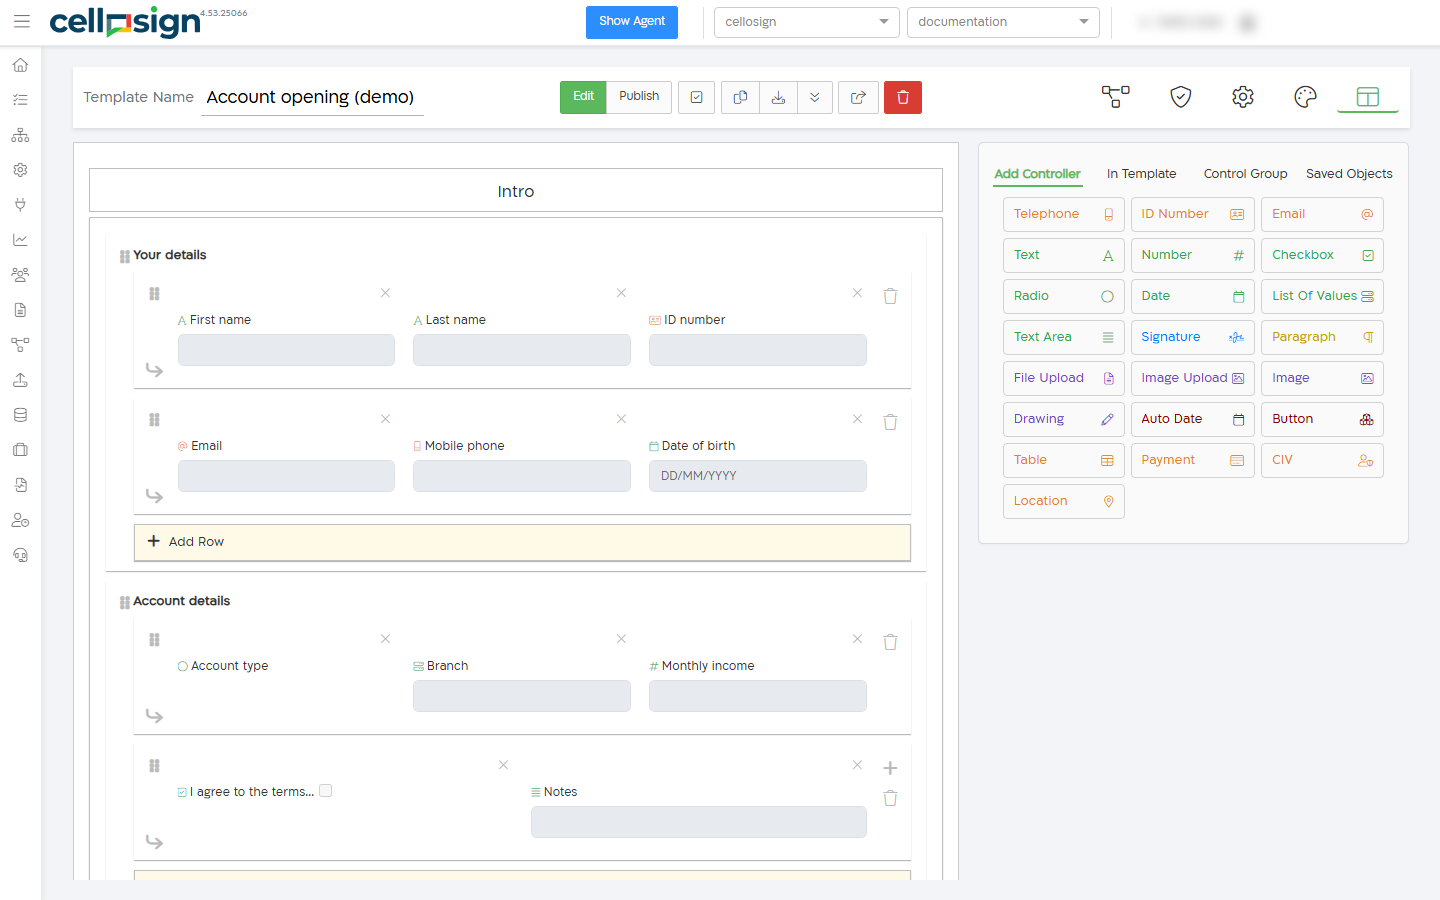
How the form is built
Section titled “How the form is built”| Level | What it holds |
|---|---|
| Intro | The welcome page, shown before the first page. See Intro (welcome page). |
| Page | One or more sections. The client moves between pages with the navigation buttons at the bottom of each page. |
| Section | One or more rows, and an optional title. |
| Row | One to three columns. |
| Column | Fields, one under the other. |
| Outro | The thank-you page, shown after the form is submitted. See Outro (thank-you page). |
The columns of a row have the same width. On a tablet or computer, they are shown side by side. On a narrow screen, such as a phone, they are shown one under the other. If every row has one column, the form is shown as one column on every screen.
When you point to an element, it’s highlighted: a page in green, a section in pink and a row in yellow.
The texts of the navigation buttons are set in Configuration.
Add pages, sections, rows and columns
Section titled “Add pages, sections, rows and columns”| To add | Do this |
|---|---|
| A page | Click Add page at the bottom of the form. A new page has one section. |
| A section | Click Add Section at the bottom of the page. A new section has one row. |
| A row at the end of a section | Click Add Row at the bottom of the section. A new row has three columns. |
| A row after a specific row | Click the arrow icon under the row’s drag handle, on the side of the row. |
| A column | Click + at the end of the row. A row can have up to three columns. |
Add fields
Section titled “Add fields”- New field: drag a field type from the Add Controller tab of the palette to a column. The field is added at the bottom of the column. See Fields.
- Field that is already in the template: drag it from the In Template tab to the place you want in a column. Use this, for example, to place again the fields of a row you deleted. If the field is already placed in another column, the Move Element window shows where it is now. Click Move to move it.
- Field settings: click a field to open its settings in the side panel. See Field settings.
Each field shows its icon, the first 20 characters of its question, and a preview of its input. A field without a question shows its ID in red.
While you add fields to a control group, clicking a field adds it to the group or removes it, instead of opening its settings. The fields of the group are highlighted. See Control Group.
Move elements
Section titled “Move elements”| To move | Drag |
|---|---|
| A field | The field, to another place in its column or to another column. |
| A row | Its drag handle (the grip icon on the side of the row), to another place in the section or to another section. |
| A section | Its drag handle (the grip icon on the side of the section), to another place in the page or to another page. |
You can’t drag pages.
When you move a section or row that has a Repeat Model, a warning tells you that this may change how the form works. See Repeat a page, section or row.
When the template is edited page by page, you can move elements only inside the page that is shown. See Edit large templates page by page.
Copy and save elements
Section titled “Copy and save elements”Right-click a field, row or section to open its menu:
| Right-click | Menu item | What it does |
|---|---|---|
| A field | Clone | Adds a copy of the field, with a new ID and the same settings, in the same column. |
| A field | Save field as template | Saves the field as a saved object, to reuse it in other templates. |
| A row | Save row as template | Saves the row and its fields as a saved object. |
| A section | Save section as template | Saves the section, with its rows and fields, as a saved object. |
The save items are shown only when saved objects are included in your organization’s plan. See Saved Objects.
When you save, the Dependencies (conditions) of the fields are not saved with them. A field that has Field Clone set can’t be saved on its own, and a row or section can be saved only if it also holds the field that the clone copies.
Note: Clone in this menu makes an independent copy of the field. It’s not related to the Field Clone setting.
Delete elements
Section titled “Delete elements”| To delete | Do this |
|---|---|
| A column | Click the X at the top of the column. The column is deleted at once. |
| A row | Click the trash icon at the end of the row. If the row has fields, click Delete to confirm. You can also select the row, click Delete Row, and click Delete to confirm. |
| A section | Select the section, click Delete Section, and click Delete to confirm. |
| A page | Select the page, click Delete Page, and click Delete to confirm. |
| A field | Click the field and click Delete Field. See Field settings. |
When you delete a column, row, section or page, its fields are not deleted. They stay in the template, and you can place them again from the In Template tab. Only Delete Field removes a field from the template.
Page, section and row settings
Section titled “Page, section and row settings”To select an element, click it outside the elements it holds:
- a page: click its margin, outside its sections;
- a section: click its margin, outside its rows;
- a row: click it anywhere outside its fields.
The side panel shows the element’s ID and type (Page, Section or Row) at the top, and these tabs, shown as icons:
| Tab | For | What’s on it |
|---|---|---|
| Basic | Page, section, row | The title and the CSS classes. |
| Style | Page, section | Colors, title style and logo or icon. |
| Data Model | Page, section, row | Repeating the element for each item in a list. |
At the bottom of the panel are Close and the delete button (Delete Page, Delete Section or Delete Row).
Every page, section and row gets an ID automatically. To change it, edit it at the top of the panel and click outside the box.
- An ID can contain only English letters, digits and underscores (
_). Other characters are removed as you type. - An ID must be unique: no other page, section, row or field can have it. If it’s taken, the box turns red and the ID isn’t changed.
The ID is added to the form’s HTML, so you can use it in the template’s CSS or JavaScript. Duplicate IDs and sections without an ID are listed on the Issues tab.
| Setting | What to enter |
|---|---|
| Page title | Page only. The title shown at the top of the page. It’s also the name of the page in the Page list when you edit by page, and in the page list of the form when Show page list is on in Design. |
| Section title | Section only. The title shown at the top of the section. |
| Class | CSS class names to add to the element, for use in the template’s stylesheet (see Configuration). Type a name and press Enter or comma. To remove a class, click its X, or press Backspace in the empty box. |
Style of a page
Section titled “Style of a page”| Setting | What it does |
|---|---|
| Title Background Color | The background color of the page title. |
| Title Style | The size of the title: Paragraph, or H1 (largest) to H4 (smallest). |
| Title Color | The color of the title text. |
| Title Position | The bar at the top of the page, with the logo (and the template name when Show template name in title is on in Design). Fixed keeps the bar at the top of the screen when the client scrolls. Relative lets it scroll with the page. |
| Show Logo | Shows the project’s logo in the bar at the top of the page. |
| Logo Height | Shown when Show Logo is on. The height of the logo in pixels. The default is 35. |
Title Style, Title Color and Title Position are shown only when the page has a title. To clear a color, click the trash icon next to it.
Style of a section
Section titled “Style of a section”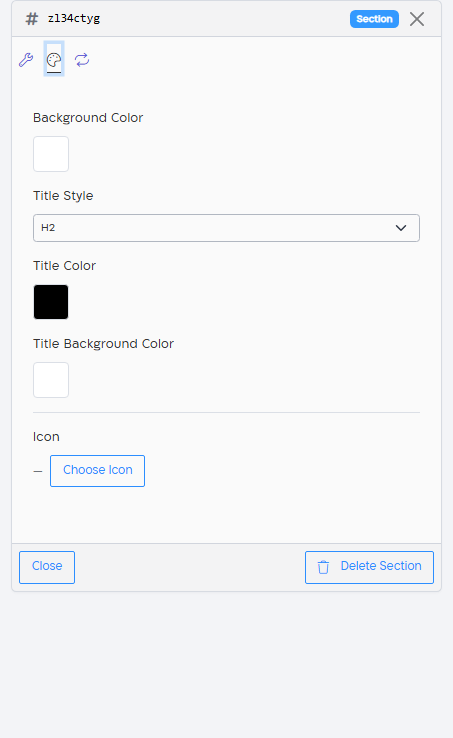
| Setting | What it does |
|---|---|
| Background Color | The background color of the section. It’s applied only when the section has a title. |
| Title Style | The size of the title: Paragraph, or H1 (largest) to H4 (smallest). |
| Title Color | The color of the title text. |
| Title Background Color | The background color of the title bar. |
| Icon | An icon shown in the title. Click Choose Icon, search by an English word (for example, “arrow”), click the icon and click Save. To remove it, click Clear Icon. |
| Icon Position | Shown when there’s an icon. Left or Right of the title. |
| Icon Color | Shown when there’s an icon. The default is dark gray. |
All the settings except Background Color are shown only when the section has a title. To clear a color, click the trash icon next to it.
Repeat a page, section or row
Section titled “Repeat a page, section or row”On the Data Model tab, you can repeat a page, section or row once for each item in a list of the template’s data model, for example a section for each insured person.
| Setting | What to enter |
|---|---|
| Repeat | Turn it on to repeat the element. |
| Repeat Model | The list in the data model to repeat by. Shows the lists at the top level of the data model. For a section or row inside a repeated page or section, it also shows the lists inside that element’s model. |
The data model is set in Configuration > Data model. See Configuration.
The elements are repeated when a process creates a template from this template and data, with the BuildTemplateFromData service. This is available only when the data model is included in your organization’s plan.
Intro (welcome page)
Section titled “Intro (welcome page)”The welcome page is the first page the client sees, with a button that opens the form. To set it up, click Intro at the top of the structure. To close its settings, click Intro again or click Close.
| Setting | What to enter |
|---|---|
| Hide welcome screen | Turn it on to skip the welcome page, so that the form link opens the first page directly. The other settings are hidden. |
| Title | The title of the welcome page. Format it in the text editor. |
| Description | The text under the title. |
| Start button text | The text of the button that opens the first page. |
If you leave them empty, the welcome page shows a default title, the template name, and a Start button. It also shows the project’s logo.
Tip: to skip the welcome page for one link only, add the parameter welcome=false to the form link.
Outro (thank-you page)
Section titled “Outro (thank-you page)”The thank-you page is shown to the client after they submit the form. To set it up, click Outro at the bottom of the structure. To close its settings, click Outro again or click Close.
| Setting | What to enter |
|---|---|
| Auto redirect | Turn it on to send the client to a web address after they submit the form, instead of the thank-you page. When it’s on, only Redirect field and Redirect address are shown. |
| Redirect field | Shown for Auto redirect. A field of the form that holds the address. Lists the template’s Text fields. |
| Redirect address | Shown for Auto redirect. A fixed address to send the client to. |
| Title | The title of the thank-you page. If you leave it empty, a default title is shown (“Session Complete” in English). |
| Description | The text under the title. |
| Redirect | Turn it on to add a button that opens a web address, for example your website. |
| Button text | Shown for Redirect. The text of the button. The default is “Close”. |
| Redirect address | Shown for Redirect. The address the button opens. The button is shown only when you enter an address. |
The thank-you page also shows the project’s logo and the transaction’s token.
Which address auto redirect uses
Section titled “Which address auto redirect uses”- The value of the Redirect field, if it’s a valid web address.
- Otherwise, the Redirect address. If a redirect URL is set when the form is sent, for example Redirect URL on a Form / Session element, that URL is used instead.
If the address doesn’t start with http:// or https://, https:// is added.
Edit large templates page by page
Section titled “Edit large templates page by page”When Edit HTML templates by page is on, the editor shows one page at a time:
- To choose the page, select it in the Page list at the top of the structure. Its settings open in the side panel.
- When you add a page, the editor shows the new page.
- When you open a field from the In Template tab or from Issues, the editor shows the page of the field.
- You can’t drag sections, rows or fields to another page. To move a field to another page, show that page and drag the field from the In Template tab.
Cellosign turns this on automatically when you open an HTML template with more than 500 fields and more than one page. To turn it off, go to Configuration > Basic.
Create an HTML form for a PDF template
Section titled “Create an HTML form for a PDF template”The HTML Template editor tab is also shown for PDF templates. When a PDF template has no HTML form yet, the tab shows Create HTML Template. Click it to create one page with one section, one row and one column that holds all the fields of the PDF. Then arrange the fields as described on this page, and save the template.
The template stays a PDF template, and the fields stay on the PDF. See PDF Template editor.