
PDF Template editor
תוכן זה אינו זמין עדיין בשפה שלך.
On the PDF Template editor tab, you place fields on the pages of a PDF template. The signer’s values are printed in these places on the signed PDF.
The tab is shown only for PDF templates, and it opens first when you open one. To create a PDF template, see Create a template.
The pages of the PDF are shown one under the other on the left. The side panel on the right shows the field palette, or the settings of the selected field.
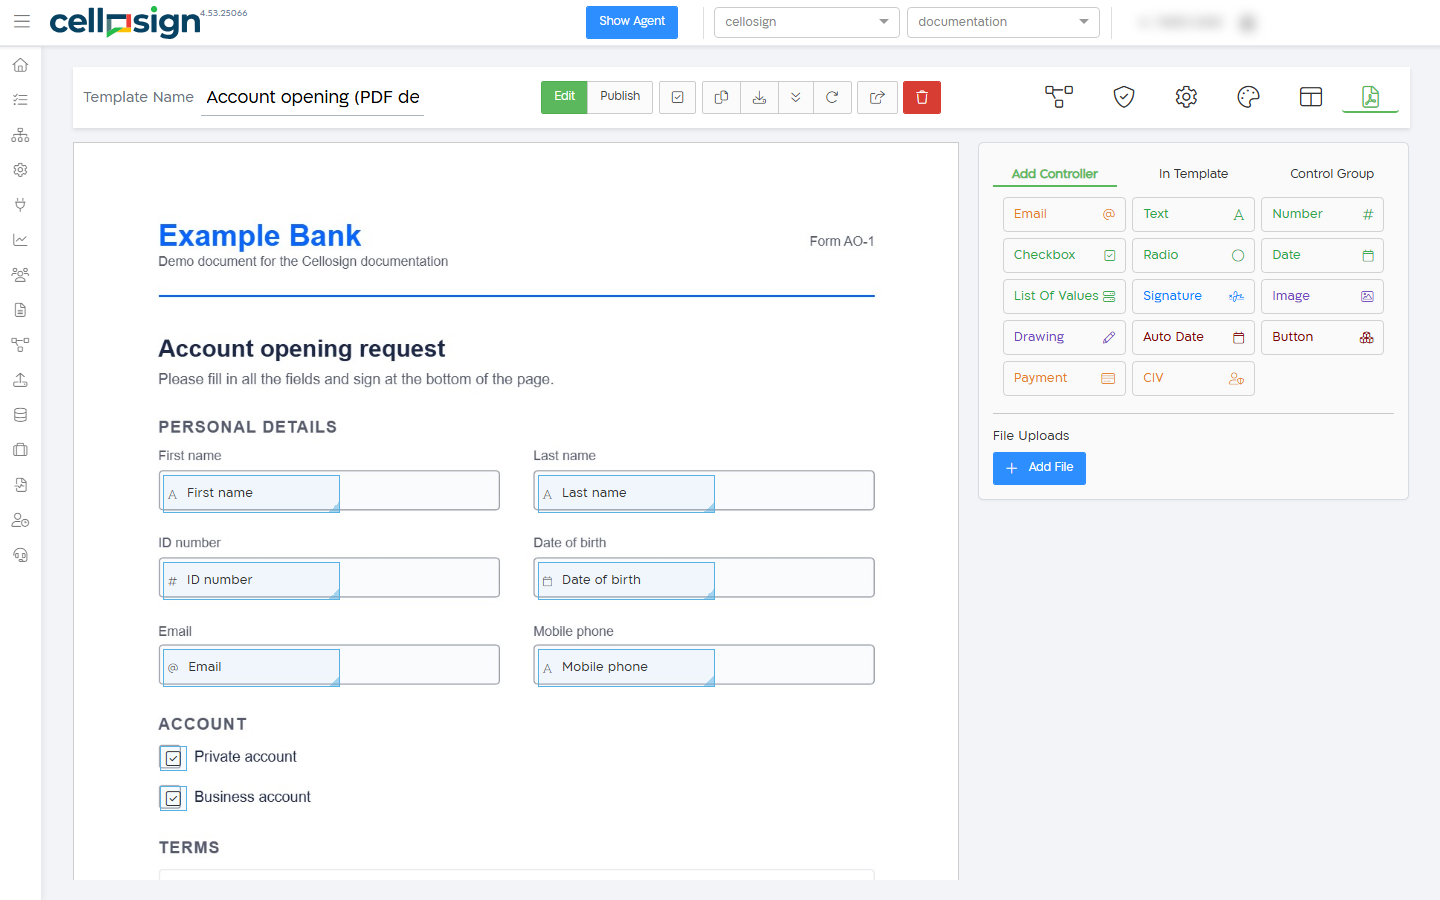
Changes on this tab are kept only after you save the template. See The template editor.
Add fields
Section titled “Add fields”- On the Add Controller tab of the side panel, find the field type.
- Drag it onto a PDF page. The top-left corner of the field is placed where you drop it.
- Click the field to open its settings.
A new field is 20% of the page wide and 3% of the page high. A checkbox is smaller, and a radio button starts as one option circle.
You can place these field types on a PDF:
| Group | Field types |
|---|---|
| Text fields | Email, Text, Number |
| Choice fields | Checkbox, Radio, List Of Values |
| Date fields | Date, Auto Date |
| Signature and drawing | Signature, Drawing |
| Display fields | Image |
| Other | Button, Payment, CIV |
Payment and CIV appear only if your plan and permissions include them.
Telephone, ID Number, Text Area, Paragraph, Table, Location and File Upload can’t be placed on a PDF. To ask for files and images, use File uploads. The Saved Objects tab of the palette isn’t available in the PDF Template editor.
For all field types, see Fields.
Radio buttons
Section titled “Radio buttons”On a PDF, each option of a radio button is a separate circle that you place on the page.
- Drag Radio onto the page. The first option is placed where you drop it.
- On the Values & Display tab of the field’s settings, click Add Item for each more option. The new option is placed next to the last one.
- Drag each circle to its place on the PDF.
Place existing fields
Section titled “Place existing fields”The In Template tab lists all fields of the template, grouped by type. To find a field, type its label or ID in the search box.
- Click a field to open its settings.
- Drag a field onto a page to place it there. Its size is kept. A field can be on one page only, so if it’s already on another page, it moves.
- A field with a green line on its left side is already placed on the PDF.
- A grayed-out field can’t be placed on a PDF (Not available in PDF mode).
Use this tab to move a field to another page, or to place fields that you added in the HTML Template editor of a hybrid template.
Move and resize fields
Section titled “Move and resize fields”- Move: drag the field. You can drag it only within its page. To move it to another page, drag it from the In Template tab.
- Resize: drag the handle in the bottom-right corner of the field. Checkboxes and radio circles have no handle.
- Set an exact position: click the field and open the Position tab of its settings.
| Setting | What it means |
|---|---|
| Top | The distance from the top edge of the page, in percent of the page height. |
| Left | The distance from the left edge of the page, in percent of the page width. |
| Height | The height of the field, in percent of the page height. |
| Width | The width of the field, in percent of the page width. |
Enter a value from 0 to 99. Other values are ignored.
Positions are relative to the page, so fields keep their place when the editor is wider or narrower.
To identify a field, point to it: the tooltip shows its ID (# and the ID) and its question. The field shows its question, or its ID when there is no question. Required fields are shown in red. An Image field shows its picture.
Clone a field
Section titled “Clone a field”Right-click the field and click Clone. The copy is placed on the same page, a little below and to the right of the original. It has the same settings and a new ID, and its settings open.
Field settings
Section titled “Field settings”Click a field to open its settings in the side panel. The tabs are the same as in the HTML Template editor, with one more tab, Position. To go back to the palette, close the settings. See Field settings.
Settings that matter most on a PDF:
- Roles: when the template has a workflow, choose which roles can edit or view the field under Workflow Permissions on the Basic and Permissions tab.
- Font: for Text, Number, Email, Date and Auto Date, set Font Size in PDF and Letter spacing in PDF on the Style tab. The default font size and color for the whole PDF are under Custom Theme > PDF Output on the Design tab.
- Delete: click Delete Field at the bottom of the Basic and Permissions tab.
Control groups
Section titled “Control groups”On the Control Group tab, click Add fields to group (the edit icon) on a group, and then click fields on the PDF to add them to the group or remove them. Fields in the group have a green border. The right-click menu isn’t available while you add fields. See Fields.
File uploads
Section titled “File uploads”Under the palette on the Add Controller tab, File Uploads lists the files and images that the signer is asked to attach.
- Click Add File.
- In Display Name, tell the signer what to upload.
- In Type, select File or Image.
- Turn on Mandatory if the signer must upload it.
To remove an upload, click its trash icon. For more settings, click the field on the In Template tab. See File Upload and Image Upload.
These fields aren’t placed on the PDF. To print an uploaded image on the signed PDF:
- Drag the Image upload from the In Template tab onto the page, and size it.
- On the Validation tab of its settings, turn on Add image to result PDF.
The image is fitted into the field’s area.
What the signed PDF shows
Section titled “What the signed PDF shows”Each value is printed in its field’s area:
| Field | What is printed |
|---|---|
| Text, Number, Email, Date, Auto Date | The value. |
| List Of Values | The selected option. |
| Checkbox | An X when it’s selected. |
| Radio | An X on the selected option. |
| Signature, Drawing, Image | The image. |
Empty fields and hidden fields aren’t printed. Button and Payment fields work while the signer fills in the form, but nothing is printed for them.
Change the PDF
Section titled “Change the PDF”You can replace the PDF of the template and keep the fields.
- Save the template. After the change, the template is reloaded, and unsaved changes are lost.
- On the PDF Template editor tab, click Change PDF background (the circular arrow icon) in the toolbar.
- Drag the new PDF file to the box, or click to select it.
- Click OK.
- If the new PDF has fewer pages than the current one, you’re asked whether to delete the extra pages. Click Yes to continue.
The change is saved right away. Fields stay at the same positions on the same page numbers. Fields on pages that were deleted are removed from the PDF. If the template has no HTML form, they are deleted from the template.
The PDF file can be up to 5 MB (the default limit). Usually all its pages must be the same size; otherwise the file is rejected. To fix this, print the document to a new PDF with one page size, and upload it again.
Hybrid templates
Section titled “Hybrid templates”A hybrid template is a PDF template that also has an HTML form: the signer fills in the HTML form, and the values are printed on the PDF. See Templates.
Every PDF template also has the HTML Template editor tab. To build the HTML form, open that tab and click Create HTML Template. All fields of the template are added to the HTML form, in the order they appear on the PDF. See HTML Template editor.
In a hybrid template:
- Both editors use the same fields. A change to a field’s settings in one editor also applies in the other.
- A field that you add in the HTML Template editor isn’t on the PDF until you drag it from the In Template tab onto a page. See Place existing fields.
- Deleting a field in either editor removes it from the whole template.
Erase the PDF
Section titled “Erase the PDF”To turn a hybrid template into an HTML template, remove its PDF. Erase PDF background is shown in the toolbar only on the PDF Template editor tab, and only when the template has an HTML form.
- Click Erase PDF background (the eraser icon) in the toolbar.
- Click Erase PDF to confirm.
- Save the template.
The PDF and the positions of the fields on it are removed, the PDF Template editor tab disappears, and the HTML Template editor tab opens. Fields that were only on the PDF stay in the template: you find them on the In Template tab. After you save, you can’t undo this.