
Fields
תוכן זה אינו זמין עדיין בשפה שלך.
Fields are the parts of a template that collect or show information: text boxes, checkboxes, lists, dates, signatures, images and more. You add fields from the field palette in the template editor, and then set up each field in the field editor.
The field palette is in the side panel of the HTML Template editor and PDF Template editor tabs. It is shown when no element is selected. When a field, row, section or page is selected, its editor takes the place of the palette; close the editor to see the palette again.
The palette has these tabs:
| Tab | What it does |
|---|---|
| Add Controller | The field types you can add. Drag a type into the template. |
| In Template | The fields that are already in the template, grouped by type. Use it to find, open and place fields. |
| Control Group | Groups of fields that share the same permissions and dependencies. |
| Saved Objects | Shown in the HTML Template editor only. It shows “Coming soon”. See Saved objects. |
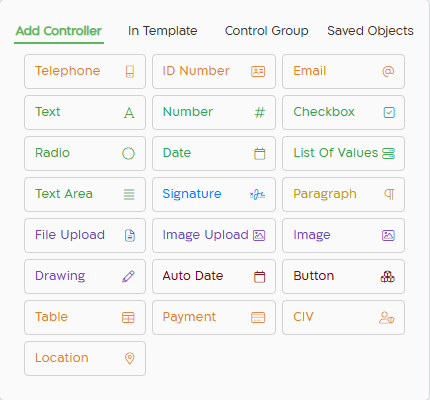
Add a field
Section titled “Add a field”In an HTML template
Section titled “In an HTML template”- Open the HTML Template editor tab.
- On the Add Controller tab of the palette, drag a field type onto a column of a row. See HTML template editor for adding rows and columns.
- The field is added at the bottom of the column. Click it to open the field editor.
In a PDF template
Section titled “In a PDF template”- Open the PDF Template editor tab.
- On the Add Controller tab, drag a field type onto the page, to the place where the field should be.
- Drag the field to move it. To resize it, drag the handle at its bottom-right corner. Checkbox and Radio fields can’t be resized.
- Click the field to open the field editor.
For a Radio field in a PDF template, each option is a separate circle on the page. See Radio.
In the PDF Template editor, File Upload and Image Upload are not on the palette. Instead, the Add Controller tab has a File Uploads section:
- Click Add File.
- Enter the Display Name, select the Type: File or Image, and turn on Mandatory if the client must upload it.
- To remove an upload field, click its trash icon.
See File Upload and Image Upload.
After you add a field
Section titled “After you add a field”Every new field gets a random ID of 12 letters and digits. You can change the ID, the label (Question) and all the other settings in the field editor. See Field settings.
Field types
Section titled “Field types”The Add Controller tab shows only the field types that are available in the current editor.
| Field | What it is for | Available in | Details |
|---|---|---|---|
| Telephone | A phone number, mobile or fixed line. | HTML only | Text fields |
| ID Number | An Israeli ID number, checked by its check digit. | HTML only | Text fields |
| One email address. Can also send the client a copy of the signed document. | HTML and PDF | Text fields | |
| Text | A single line of text, with optional masks and character rules. | HTML and PDF | Text fields |
| Number | A number, with optional minimum, maximum and counter buttons. | HTML and PDF | Text fields |
| Checkbox | A single box that is checked or not. | HTML and PDF | Checkbox |
| Radio | A choice from a list of options shown on the form. | HTML and PDF | Radio |
| Date | A date, or a date and time, picked from a calendar. | HTML and PDF | Date |
| List Of Values | A drop-down list, from values you type or from a dictionary. | HTML and PDF | List Of Values |
| Text Area | Several lines of text. | HTML only | Text fields |
| Signature | A signature that the signer draws. | HTML and PDF | Signature |
| Paragraph | Formatted text shown in the form. | HTML only | Paragraph |
| File Upload | A file that the client uploads. | HTML only (in PDF templates, use File Uploads) | File Upload |
| Image Upload | An image that the client uploads. | HTML only (in PDF templates, use File Uploads) | Image Upload |
| Image | An image that you add to the form, such as a logo. | HTML and PDF | Image |
| Drawing | A drawing area, optionally with a background image. | HTML and PDF | Drawing |
| Auto Date | The date of submission, added automatically. | HTML and PDF | Auto Date |
| Button | A button that runs an integration when it is clicked. | HTML and PDF | Button |
| Table | A read-only table of data, filled in by an integration. | HTML only | Table |
| Payment | A button that opens a credit card payment. | HTML and PDF | Payment |
| CIV | A button that starts biometric identification of the client. | HTML and PDF | CIV |
| Location | A location on a map. | HTML only | Location |
Payment, CIV and Location appear on the palette only when your plan includes payment integrations, CIV or maps, and you have permission to use them in the project.
The In Template tab
Section titled “The In Template tab”The In Template tab lists every field in the template, grouped by type, with the number of fields of each type.
- To find a field, type part of its label or ID in Search by label or ID…. Click Clear to show all fields again.
- To open a field in the field editor, click it.
- A field with a green bar on its left is placed in the current editor. A field without it exists in the template but is not placed in this editor. Drag it into the template to place it.
- To move a field, drag it from the list to its new place. In the HTML Template editor, if you drop it on a different column, Cellosign asks you to confirm the move. In the PDF Template editor, drop it on the page.
In the PDF Template editor, field types that are available only in HTML templates are dimmed and can’t be dragged. Their tooltip says “Not available in PDF mode”.
Control groups
Section titled “Control groups”A control group is a set of fields that share the same permissions (Required, Show, Agent Allowed, Client Allowed, and the permissions of each role in a workflow) and the same dependencies. You set them once for the group instead of for each field. For example, you can show ID, email, phone and signature fields only when a checkbox is checked, and make them required at the same time.
Create a group
Section titled “Create a group”- On the Control Group tab, enter a name in the Group name box.
- Click Add Group, or press Enter. If you don’t enter a name, the group is named
group-and the current time, for examplegroup-142530.
In a new group, Required, Show, Agent Allowed and Client Allowed are on. In a template with a workflow, every role can edit and view the group’s fields.
Add fields to a group
Section titled “Add fields to a group”- Click the pencil icon (Add fields to group) of the group. The icon turns green, and you can rename the group in its header.
- Click each field to add in the template, in the HTML Template editor or the PDF Template editor. Fields in the group get a green border and are listed under the group, with their type.
- To remove a field, click it again, or click the X next to it in the group’s list.
- Click the pencil icon again when you finish.
A field can belong to one group only. If you add a field that is in another group, it moves to this group. When a field joins a group, it gets the group’s permissions and dependencies.
Set the group’s permissions and dependencies
Section titled “Set the group’s permissions and dependencies”- Click the gear icon (Edit group permissions) of the group. Group Settings opens, with two tabs: Permissions and Dependency.
- Set the permissions and the dependencies. They work like the settings of a single field. See Field settings.
- Close Group Settings with the X button.
Your changes apply to every field in the group.
Fields that belong to a group
Section titled “Fields that belong to a group”In the field editor of a field that belongs to a group:
- The Basic and Permissions tab shows only the Question and the Description, and the note Managed by group with the group’s name.
- The Dependencies tab is not shown.
The other tabs of the field work as usual.
Delete a group
Section titled “Delete a group”Click the trash icon (Delete group) of the group. The group is deleted right away. Its fields keep the permissions and dependencies they got from the group. To change them, edit each field.
Saved objects
Section titled “Saved objects”If your plan includes saved templates and you have permission to use them, you can save a field, a row or a section of an HTML template for reuse. In the HTML Template editor, right-click the element and select:
- Save field as template, for a field;
- Save row as template, for a row and all its fields;
- Save section as template, for a section and all its fields.
The field’s dependencies are not saved.
You can’t save a field that is a clone of another field (“Cannot save a cloned field”). A row or a section can’t be saved if one of its fields is a clone of a field outside it.
The Saved Objects tab of the palette shows “Coming soon”: in this version, you can’t add saved objects to a template from the palette.