
Inputs and data
תוכן זה אינו זמין עדיין בשפה שלך.
Data moves through a process from element to element. Each element can have outputs, for example the submitted form of a Form / Session or the response of a Web Service. An element that needs data gets it through its inputs: each input takes a value from an output of an earlier element, from the start data, or from a process value.
The Inputs tab
Section titled “The Inputs tab”Most elements have an Inputs tab with two parts:
- Auto-bound inputs, marked “Auto-bound from previous node”: the outputs of the elements connected directly before this element are added as inputs automatically when you select the element. Gateways and Meta Information elements in between are skipped, so the outputs of the elements before them are used.
- Custom inputs: inputs you add yourself, for example a value from an element further back in the process.
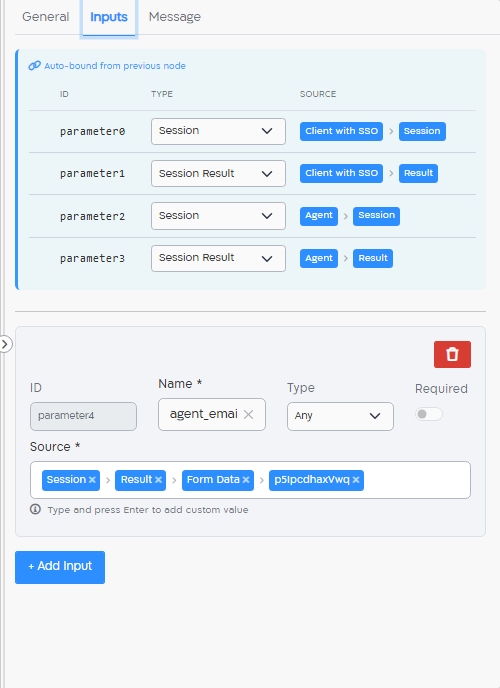
To add a custom input, click + Add Input:
| Field | What to enter |
|---|---|
| ID | Created automatically: parameter1, parameter2 and so on. IDs are unique within the element. Click the ID to copy it. |
| Name | A name for the input. Required. |
| Type | The type of the value. See below. Default: Any. |
| Required | Turn it on if the element can’t work without this value. |
| Source | Where the value comes from. Required. See Choose the source. |
To remove a custom input, click its trash icon. Auto-bound inputs can’t be removed, but you can change their Type.
Because auto-bound inputs are added when you select an element, selecting an element can mark the workflow as changed. Save the workflow before you start a process.
Any, String, Number, Phone, Email, Boolean, Datetime, Dict (an object with named values), List, Document, Template, Session (a form’s transaction) and Session Result (a submitted form).
Some settings accept only inputs of a certain type. For example, the Invitation Session of a message lists only inputs of type Session.
The Start Event has its own, shorter list of types.
If you change the type of an auto-bound input so that it’s different from the type of its source, a warning icon is shown next to it. Point to the icon to see the details. A value of the wrong type can make the element fail or get wrong data.
Choose the source
Section titled “Choose the source”Click Source to choose where the value comes from:
- Select an earlier element. Only the elements before this element in the process are listed.
- Select its output, for example Result, and then a part of it, for example Form Data. An arrow (›) means there is another level.
- To use a single form field, type the field’s ID after Form Data and press Enter.
The selected path is shown as chips, for example Session › Result › Form Data › first_name. Click × on a chip to remove it and the levels after it.
You can also select:
- Previous Node: the outputs of the element right before this one;
- Last Submitted Session Node: the most recently submitted form;
- Current Loop Element and Current Loop Index: in a multi-instance element. See Repeat an element for each item.
Outputs of each element
Section titled “Outputs of each element”| Element | Outputs |
|---|---|
| Start Event | Its inputs. |
| Form / Session | session (Session): the transaction. result (Session Result): the submitted form, with Form Data, the session and the Signed Document. |
| Web Service | Body and Status Code. |
| Script Task | returnValue: the value the script returns. |
| Database Task | count, entries or object, depending on the action. |
| Call Activity | child_status and child_id. |
| Sub Process | The outputs of its Output Node, or Results Collection for a multi-instance sub process. |
| Message, gateways, signals, Meta Information, end events | No outputs. |
Use values in the settings
Section titled “Use values in the settings”Many settings have a switch with a link icon. Turn it on to take the value from a Reference instead of typing it. A reference can be one of the element’s inputs or a process value. To use a value from an earlier element, first make sure it’s an input of this element.
These process values are available:
| Value | What it holds |
|---|---|
Process ID ($id) |
The ID of the process. |
Process Name ($name) |
The name of the process. |
Business Key ($businessKey) |
The ID of the business process the process belongs to. |
Initiator ($initiator) |
The user who started the process: Username, First Name, Last Name, Email, Phone and Context. |
In text such as an email body, an SMS text, a process name or a request body, write the input’s ID in double braces, for example Dear {{parameter1}}.
In JavaScript (script tasks, conditions, request bodies and response parsers), use the input’s ID as a variable, for example parameter1.
Repeat an element for each item
Section titled “Repeat an element for each item”A Form / Session, Web Service, Script Task, Database Task or Sub Process can run once for each item in a list, for example to send the same form to each signer.
- Make sure the element has an input of type List (or Dict or Any) with the items.
- Click Change type on the element and turn on Parallel multi-instance or Sequential multi-instance at the top of the menu. The Multi Instance tab appears.
- On the Multi Instance tab, select the Collection: the input with the items.
- Turn on Is sequential (or parallel) to run the items one after another, or leave it off to run them all at the same time.
The process continues after all the items are done. In the element’s settings, use Current Loop Element for the current item and Current Loop Index for its position.
To repeat several steps for each item, put them in a Sub Process and make the sub process multi-instance.